How to Blow Out Water Lines with Air Compressor Guide
Blowing out water lines with an air compressor is the best way to prevent frozen pipes and costly water damage during winter. This guide walks you through every step, from gathering the right equipment to safely clearing water from your plumbing system. You will learn the proper PSI settings, which fittings to use, and how to protect your home’s water lines all season long.
Winter is coming, and your plumbing is not ready. Frozen water lines are one of the most common and expensive home problems people face every year. A single burst pipe can cause thousands of dollars in water damage. The good news is that a simple process called blowing out your water lines can save you from all of that trouble.
Using an air compressor to blow out water lines is the most effective method for removing water from your plumbing system before temperatures drop. Whether you have a sprinkler system, irrigation lines, or household plumbing, this guide will show you exactly how to do it right. We will cover everything from the tools you need to the step-by-step process, common mistakes, and expert tips that make the job easier and safer.
Key Takeaways
- Blowing out water lines prevents frozen pipes and expensive plumbing repairs during cold months.
- You need the right equipment, including a compatible air compressor, blowout plugs, and safety gear.
- Always start with the lowest PSI and increase gradually to avoid damaging your plumbing system.
- The process differs slightly for sprinkler systems, irrigation lines, and household plumbing.
- Skipping the blowout can lead to burst pipes, water damage, and thousands of dollars in repairs.
- Regular maintenance and proper storage of your compressor extend its lifespan and performance.
📑 Table of Contents
- Why Blowing Out Water Lines Matters
- Tools and Equipment You Will Need
- Step-by-Step Process to Blow Out Water Lines
- Common Mistakes to Avoid
- Blowing Out Different Types of Water Lines
- How to Choose the Right Air Compressor for the Job
- Expert Insights and Pro Tips
- How Often Should You Blow Out Water Lines?
- When to Call a Professional
- Conclusion
Why Blowing Out Water Lines Matters
Water expands when it freezes. When water sits inside your pipes and the temperature drops below freezing, that expansion creates enormous pressure. Over time, that pressure causes cracks, splits, and full bursts in your plumbing. The damage can be hidden inside walls, under floors, and in crawl spaces where you cannot see it until it is too late.
Blowing out water lines with compressed air removes all the standing water from your pipes, leaving nothing behind to freeze. Think of it like draining a glass of water, but for your entire home’s plumbing system. It is a simple concept, but doing it correctly matters a lot.
Who Needs to Blow Out Water Lines?
Not everyone needs to do this, but many homeowners should. Here are the groups who benefit most from blowing out their water lines:
- Homeowners in cold climates where temperatures regularly drop below freezing.
- People with vacation homes or seasonal properties that sit empty during winter.
- Those with irrigation systems and sprinkler lines that hold water in underground pipes.
- Boat owners and RV owners who store their vehicles during cold months.
- Anyone who has experienced frozen pipes before and wants to prevent it from happening again.
Tools and Equipment You Will Need
Before you start, make sure you have everything ready. Gathering your tools ahead of time saves frustration and keeps the job moving smoothly. Here is a complete list of what you need.
Air Compressor
Your air compressor is the star of the show. You need a compressor that can deliver enough pressure and volume to push water through your pipes. Most home air compressors work fine for this job. Look for a compressor with at least 3 to 5 CFM (cubic feet per minute) at 40 PSI. A larger tank size helps because it gives you more air before you need to wait for the pump to recharge.
If you are using a portable generator to power your compressor, make sure you know how to start a generator properly and that it has enough wattage for your compressor’s needs. Understanding how does a generator work can also help you choose the right size and avoid overloading the system during the blowout process.
Blowout Plug and Fittings
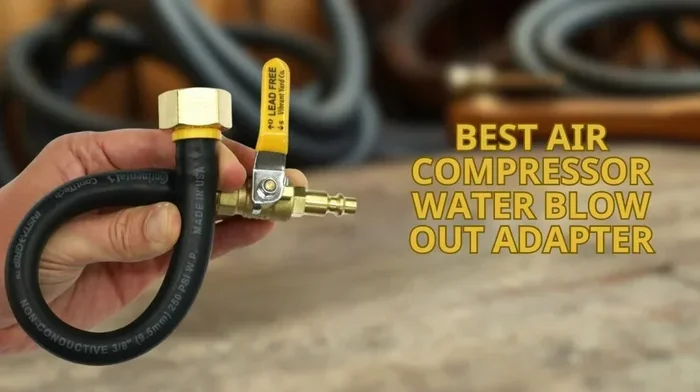
You need a blowout plug or blowout cap that matches the thread size of your outdoor water faucet or hose bib. These plugs create a tight seal so the compressed air stays inside the system and pushes the water out. You will also need a few adapter fittings if your compressor hose does not connect directly to the blowout plug.
Safety Equipment
Safety should always come first when working with compressed air. Here is what you need:
- Safety glasses to protect your eyes from debris or water spray.
- Work gloves to protect your hands from fittings and cold surfaces.
- Hearing protection if your compressor is loud.
- Closed-toe shoes for foot protection.
Additional Helpful Tools
- Pressure regulator to control the PSI output from your compressor.
- Compressor hose long enough to reach from your compressor to the water line connection point.
- Bucket or drain pan to catch any remaining water at the lowest points in your system.
- Wrench for tightening fittings and removing hose connections.
Step-by-Step Process to Blow Out Water Lines
Now for the part you have been waiting for. Here is the complete process for blowing out your water lines using an air compressor. Follow each step carefully and do not skip anything.
Step 1: Turn Off the Water Supply
Find your main water shutoff valve and turn it off completely. This stops any new water from entering your plumbing system. After you shut it off, open the lowest faucet in your home, usually an outdoor spigot or a basement faucet. Let the gravity drain do its work and remove as much water as possible before you introduce air.
Opening multiple faucets throughout the house helps speed up this draining process. Water flows downhill, so the lowest points in your system will drain first. Give it at least 15 to 20 minutes for most of the water to leave the pipes.
Step 2: Connect the Air Compressor
Attach your compressor hose to the blowout plug. Make sure all connections are tight and secure. A loose fitting will let air escape and reduce the pressure needed to push water out of the lines. Connect the other end of the hose to your compressor’s air outlet.
If you are running your compressor from a backup power source, you may need to connect a generator to your house using the proper transfer setup. Always follow safety guidelines when connecting any power equipment to your home’s electrical system.
Step 3: Set the Correct PSI
This is where many people make mistakes. You do not need extreme pressure to blow out water lines. Start with a low PSI setting, around 30 to 50 PSI. Too much pressure can damage your pipes, fittings, or the compressor itself. The goal is steady, consistent air flow, not a blast of force.
Most household water lines can handle up to 80 PSI safely, but starting low gives you room to adjust. Watch the fittings and connections for any signs of leaking as you increase the pressure gradually.
Step 4: Open the Faucets and Start Blowing
Open the faucet or hose bib where the blowout plug is connected. Turn on the compressor and let the compressed air push the water through the lines. You will hear water gurgling and sputtering at first. That is normal. Keep the faucet open and let the air do the work.
Move from faucet to faucet throughout your home. Open each one for a few minutes to clear the water from that section of piping. Start from the lowest level of your home and work your way up. This gravity-assisted approach helps remove the most water possible.
Step 5: Blow Out the Main Line Completely
Once you have cleared all the individual faucets, go back to the main line. Let the compressor run with the blowout plug connected for several more minutes. You want to make sure all remaining water has been pushed out of the main supply line. Listen for changes in the sound of the air. When the air comes out steady and dry with no sputtering, you are close to done.
Step 6: Disconnect and Store Equipment Properly
Turn off the compressor and release the remaining pressure in the hose before disconnecting anything. Remove the blowout plug carefully and store it in a safe place. Drain your compressor tank and store the compressor in a dry location for the winter. Proper storage keeps your equipment ready for the next time you need it.
Common Mistakes to Avoid
Blowing out water lines is not difficult, but small mistakes can cause big problems. Here are the most common errors homeowners make and how to avoid them.
- Using too much PSI. High pressure can crack pipes, blow out fittings, or damage your compressor. Always start low and increase gradually.
- Skipping the drain step. If you do not let gravity remove as much water as possible first, the compressor has to work much harder. This wastes energy and puts extra strain on your equipment.
- Forgetting to open multiple faucets. Blowing out only one faucet leaves water trapped in other sections of your plumbing system. Go through every faucet in the house.
- Using the wrong blowout plug size. A plug that does not fit properly will leak air and reduce the effectiveness of the blowout. Measure your faucet threads carefully before buying a plug.
- Not blowing out sprinkler systems. Many people remember the house plumbing but forget the irrigation lines. Underground sprinkler lines are especially vulnerable to freeze damage because they hold water that is hard to drain naturally.
- Ignoring the compressor maintenance. After the blowout, moisture can remain inside your compressor tank. Drain the tank after every use to prevent rust and extend the life of your equipment.
Blowing Out Different Types of Water Lines
Not all water lines are the same, and each type requires a slightly different approach. Here is how the process changes depending on what kind of lines you are dealing with.
Household Plumbing Lines
For standard household plumbing, the process described above works perfectly. Focus on opening every faucet, including outdoor spigots, bathroom sinks, kitchen faucets, and basement drains. Pay special attention to any lines that run through unheated spaces like garages, crawl spaces, or exterior walls.
Irrigation and Sprinkler Systems
Underground sprinkler systems are a bit different because the water sits in pipes buried below the frost line. The compressed air method works well here, but you need to be extra careful about pressure. Sprinkler system pipes are often made of PVC or polyethylene, which can crack under too much pressure.
Start at the lowest point in your irrigation system, usually the main line connection. Open the blowout valve and let the air push water through all the sprinkler heads. You will see water spraying out of each head as the air clears the lines. Move through each zone of your sprinkler system one at a time.
Well Water Systems
If your home uses a well water system, you have additional components to consider. The well pipe, pressure tank, and any connecting lines all need to be cleared of water. Start by shutting off the well pump and opening all faucets in the house. Then connect the air compressor to the well casing or the nearest available fitting and blow the water out section by section.
How to Choose the Right Air Compressor for the Job
Not all air compressors are created equal when it comes to blowing out water lines. Here are the key factors to consider when selecting your compressor.
Tank Size
A larger tank holds more compressed air, which means you can blow out more pipe before the compressor needs to cycle on again. For most residential water line blowouts, a tank size of 60 gallons or larger is ideal. Smaller tanks can work, but you will need to wait longer between air bursts.
CFM Rating
CFM stands for cubic feet per minute, and it measures how much air your compressor can deliver. For blowing out water lines, you want a compressor that delivers at least 4 to 5 CFM at 40 PSI. This provides enough air flow to push water through standard household pipes without putting excessive strain on the system.
Portability
If you need to move your compressor between different connection points around your property, consider a wheeled or portable model. Stationary compressors work fine if your compressor setup is close to where you need to connect to the water lines.
Expert Insights and Pro Tips
Here are some professional tips that experienced plumbers and HVAC technicians use when blowing out water lines. These insights can save you time, money, and headaches.
Tip 1: Use a pressure regulator. Even if your compressor can produce high pressure, a regulator lets you dial it down to a safe level for your plumbing. This simple attachment gives you precise control and protects your pipes.
Tip 2: Heat the air if temperatures are extremely low. In very cold conditions, the compressed air coming from your compressor may be cold enough to cause condensation inside the pipes. Some professionals use a heat tape or warm air attachment on the compressor output to prevent this. This is especially important for irrigation systems.
Tip 3: Blow out lines in sections. Rather than trying to clear your entire plumbing system at once, focus on one section at a time. This gives you better control over the air pressure and ensures that each section gets thoroughly cleared.
Tip 4: Add antifreeze as a backup. For extra protection, especially in areas with harsh winters, consider adding non-toxic antifreeze to your drain traps and low points in the plumbing system. This provides a secondary layer of freeze protection even if a small amount of water remains.
Tip 5: Document your system. Take photos or notes of your plumbing layout before you start. This makes it easier to remember which lines you have cleared and which areas might need extra attention. It also helps if you ever need to call a professional for repairs.
How Often Should You Blow Out Water Lines?
The general rule is simple: blow out your water lines once every year before winter arrives. This applies to household plumbing, sprinkler systems, and irrigation lines alike. If you live in an area with mild winters, you might be able to skip a year, but it is always better to be safe than sorry.
For sprinkler systems and irrigation lines, the timing is especially important. These systems hold water in underground pipes that are exposed to freezing temperatures for months. A thorough blowout every fall keeps these lines safe and ready for the next growing season.
If you use your compressor for other tasks throughout the year, make sure to maintain it properly. Regular oil changes, filter replacements, and tank drainage keep your compressor running smoothly and ready for the next blowout session.
When to Call a Professional
Blowing out water lines is a task many homeowners can handle themselves, but there are situations where calling a professional makes sense. Here are some signs that you should get expert help:
- Your plumbing system has unusual or hard-to-access lines that you cannot safely connect the compressor to.
- You have experienced pipe damage in the past and are unsure about the condition of your current plumbing.
- You do not have the right equipment or feel uncomfortable working with compressed air.
- The blowout process is not removing water effectively, which could indicate a blockage or other underlying issue.
- You need to blow out a large commercial property with extensive plumbing systems that require specialized equipment.
Professional plumbers have industrial-grade compressors and the experience to handle complex systems quickly and safely. If you are ever unsure about any part of the process, it is worth the investment to hire an expert rather than risk damaging your plumbing.
Conclusion
Blowing out water lines with an air compressor is one of the most important things you can do to protect your home from winter damage. It is a straightforward process that requires the right tools, a bit of patience, and attention to safety. By following the steps in this guide, you can remove all the water from your plumbing system and prevent the costly headaches that come with frozen pipes.
Remember to start with the right equipment, set your compressor to a safe PSI, and work through your plumbing system methodically. Avoid the common mistakes, take advantage of the pro tips, and never underestimate the power of a good blowout. Your pipes will thank you when the temperatures drop and everything keeps working exactly as it should.
Take action now before the cold weather arrives. Gather your tools, connect your compressor, and give your water lines the protection they deserve. A little effort today can save you from a major disaster tomorrow.
Frequently Asked Questions
Can any air compressor be used to blow out water lines?
Most standard home air compressors work fine for this task. You need a compressor that delivers at least 3 to 5 CFM at 40 PSI. Very small compressors may not have enough air flow to clear water effectively, so check your compressor specs before starting.
What PSI should I use when blowing out water lines?
Start with 30 to 50 PSI and increase gradually if needed. Most household plumbing can handle up to 80 PSI safely, but using less pressure reduces the risk of damaging pipes or fittings. Always use a pressure regulator for precise control.
Is blowing out water lines the same as winterizing a sprinkler system?
Yes, the process is very similar. Both involve using compressed air to push water out of pipes before freezing temperatures arrive. The main difference is that sprinkler systems have underground lines and multiple zones that each need to be cleared separately.
How long does it take to blow out water lines with an air compressor?
For a typical home, the process takes about 30 to 60 minutes. Larger homes or properties with extensive irrigation systems may take longer. The time depends on the number of lines, the length of the plumbing, and the compressor size.
What happens if I do not blow out my water lines before winter?
Water left in pipes can freeze, expand, and cause cracks or bursts. This leads to water damage inside walls, under floors, and in crawl spaces. Repairing burst pipes can cost hundreds or even thousands of dollars, making the blowout process a worthwhile investment.
Can I blow out water lines without a compressor?
You can use gravity drainage by opening all faucets and flushing toilets, but this method does not remove all water from the pipes. Compressed air is the most effective method because it pushes water out completely, including water trapped in low spots and horizontal pipe sections.
=== INTERNAL LINKS ===
For more information on related topics, check out these helpful guides:
- How to start a generator – Learn the basics of safely starting your generator to power tools like air compressors during winter prep.
- How does a generator work – Understand generator mechanics to choose the right power source for your compressor setup.
- How to connect a generator to your house – A complete guide to safely connecting backup power to your home for running equipment during cold weather tasks.