how to disinfect nail tools for a safe manicure at home
Knowing how to disinfect nail tools is essential for anyone who enjoys a safe at-home manicure. Proper sanitation prevents bacterial infections, fungal growth, and cross-contamination between nails. This guide covers everything from the best disinfectants to step-by-step cleaning routines that keep your tools sterile and ready for use.
Whether you are a nail art enthusiast or someone who simply keeps their nails neat and tidy, how to disinfect nail tools is a question that deserves serious attention. Every time you trim, file, or shape your nails, your tools come into contact with skin cells, oils, and moisture. Over time, this creates a breeding ground for bacteria, fungi, and other harmful organisms.
A safe at-home manicure starts with clean tools. Many people overlook nail tool hygiene, but the consequences can be real. Ingrown nails, fungal infections, and bacterial outbreaks are all linked to dirty manicure instruments. The good news is that sanitizing nail instruments does not require expensive equipment or a salon visit. With the right supplies and a consistent routine, you can keep your tools in pristine condition.
This article walks you through everything you need to know about disinfecting nail tools for a safe manicure at home. From choosing the right disinfectant to establishing a daily cleaning habit, you will find practical advice you can start using today. Let us dive in.
Key Takeaways
- Disinfecting nail tools prevents infections: Regular cleaning kills bacteria, fungi, and viruses that cause nail and skin problems.
- Barbicide and isopropyl alcohol are top choices: These salon-grade disinfectants are effective and easy to use at home.
- Follow a strict cleaning routine: Soak, scrub, disinfect, and dry your tools after every use for the best results.
- Replace worn tools regularly: Dull or damaged tools harbor bacteria and make disinfection less effective.
- Never share nail tools without sterilizing: Cross-contamination spreads infections like nail fungus and staph bacteria.
- Store tools in a clean, dry case: Proper storage prevents recontamination after disinfection.
📑 Table of Contents
- Why Disinfecting Nail Tools Matters
- What You Need to Disinfect Nail Tools
- Step-by-Step Guide to Disinfecting Nail Tools
- Best Disinfectants for Nail Tools
- Common Mistakes to Avoid When Disinfecting Nail Tools
- How Often Should You Disinfect Your Nail Tools
- Expert Tips for Keeping Nail Tools Sterile
- When to Replace Your Nail Tools
- Conclusion
Why Disinfecting Nail Tools Matters
Your nail tools touch your skin and nails every time you use them. That means they pick up more than just polish and nail dust. Bacteria, yeast, and mold can all live on the surface of unsterilized tools. When you use the same dirty clippers on healthy nails, you risk spreading infection.
Here are some of the main reasons nail tool hygiene should never be ignored:
- Prevents bacterial infections: Staph and strep bacteria thrive on damp tools. A simple cut from a dirty clipper can lead to painful redness and swelling.
- Reduces fungal risk: Nail fungus spreads easily through shared or unclean tools. Disinfecting after each use breaks the cycle of reinfection.
- Protects your cuticles: The skin around your nails is delicate. Bacteria trapped on tools can cause cuticle infections and inflammation.
- Extends tool life: Clean tools last longer. Buildup and corrosion from organic matter dull blades and damage files.
- Promotes healthier nail growth: When your tools are sterile, your nails can grow without interference from infections or inflammation.
Think of sanitizing manicure tools the same way you think about washing your hands before eating. It is a small habit that makes a big difference. Whether you do your nails at home or occasionally help a friend, clean tools should always be non-negotiable.
What You Need to Disinfect Nail Tools
Before you start, gather your supplies. You do not need a lot of products, but having the right ones makes the process faster and more effective.
Essential Supplies
- Barbicide solution: This is the classic salon disinfectant. It kills bacteria, fungi, and viruses on contact. You can find it at most beauty supply stores.
- 70% isopropyl alcohol: A strong and affordable alternative to Barbicide. It evaporates quickly and leaves tools dry and ready to use.
- Antifungal solution: For extra protection against nail fungus, an antifungal soak adds an additional layer of safety.
- Soft-bristle brush: A small brush helps you scrub away debris from crevices and joints on your tools.
- Lint-free cloths or paper towels: These are used for drying and polishing tools after disinfection.
- A clean container or jar: For soaking tools in your disinfectant solution.
- Storage case: A dedicated case keeps sterilized tools organized and protected from dust.
Optional but Helpful Extras
Some nail enthusiasts like to go the extra mile with their tool care. An autoclave sterilization unit is a great investment if you use metal tools frequently. Autoclaves use pressurized steam to achieve true sterilization, which goes beyond simple disinfection. You can also use UV sanitizing boxes, though they work best as a secondary method alongside chemical disinfection.
If you use powered nail tools, such as electric nail files or drills, keep them clean too. For those who also work with compressor-powered equipment, maintaining overall tool hygiene matters. Check out our guide on how to use a nail gun with compressor for tips on keeping powered nail tools in great shape.
Step-by-Step Guide to Disinfecting Nail Tools
Now that you have your supplies, let us walk through the actual process. Following these steps every time you finish a manicure ensures your tools are properly disinfected and ready for storage.
Step 1: Remove All Debris
Start by wiping off any nail polish, acrylic residue, or nail dust from your tools. Use a lint-free cloth or a soft brush to gently remove buildup. Do not skip this step. Trapped debris can shield bacteria from your disinfectant and reduce its effectiveness.
For metal tools like clippers and nippers, pay close attention to the hinge area. This is where grime tends to accumulate the most. A small brush dipped in warm soapy water works wonders here.
Step 2: Soak in Disinfectant Solution
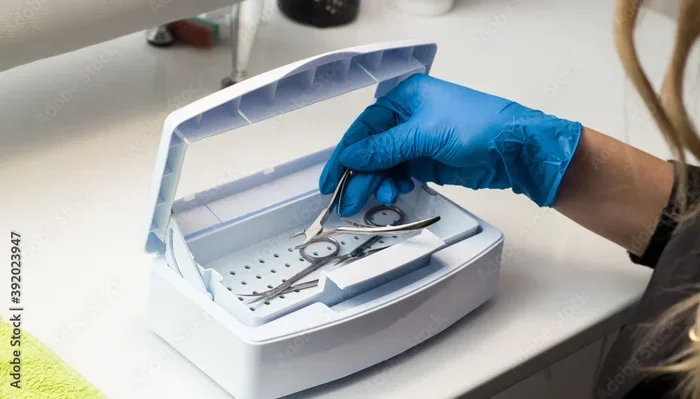
Place your clean tools into a container filled with your chosen disinfectant. Barbicide should be used according to the manufacturer’s instructions, typically requiring a 10-minute soak. If you prefer isopropyl alcohol, a 10 to 15-minute soak is effective for most tools.
Make sure the tools are fully submerged. Parts that touch nails and skin must be completely covered by the solution. If your container is too small, use a resealable bag filled with disinfectant as an alternative.
Step 3: Scrub Away Remaining Residue
After soaking, take each tool out and give it a light scrub with your soft-bristle brush. This removes any remaining organic matter that the solution may have loosened. Pay special attention to textured surfaces on nail files and the serrated edges of clippers.
Step 4: Rinse and Dry Thoroughly
Rinse your tools under clean running water to remove any chemical residue. Then dry them completely with a lint-free cloth. Moisture left on tools can lead to rust and create an environment where bacteria can regrow. This step is just as important as the disinfection itself.
For those who also maintain an air compressor for their nail tools, keeping that equipment clean is equally important. Learn how to drain craftsman air compressor to prevent moisture buildup that could affect your pneumatic tools.
Step 5: Store in a Clean Container
Once your tools are completely dry, place them in a dedicated storage case. Avoid tossing them into a junk drawer where they can pick up dust and new bacteria. A clean, enclosed case keeps your disinfected tools ready for the next use.
Best Disinfectants for Nail Tools
Not all disinfectants are created equal. Choosing the right product matters for both effectiveness and safety. Here is a quick comparison of the most popular options.
| Disinfectant | Effectiveness | Ease of Use | Cost | Best For |
|---|---|---|---|---|
| Barbicide | Kills bacteria, fungi, and viruses | Easy soak method | Low to moderate | Salon-grade disinfection at home |
| Isopropyl Alcohol (70%) | Kills most bacteria and viruses | Quick soak and wipe | Very low | Daily disinfection of metal tools |
| Antifungal Solution | Targets fungal organisms specifically | Soak for 10 to 15 minutes | Moderate | Preventing and treating nail fungus |
| UV Sanitizing Box | Reduces surface bacteria | Place and activate | High upfront cost | Storage and secondary sterilization |
| Hydrogen Peroxide (3%) | Broad-spectrum disinfection | Soak for 10 minutes | Very low | Budget-friendly alternative |
For most home users, Barbicide and 70% isopropyl alcohol strike the best balance between effectiveness and convenience. If you are prone to nail fungus or have had recurring infections, consider adding an antifungal solution to your routine. Sterilize manicure tools with whichever method fits your budget and lifestyle, but never skip the step entirely.
Common Mistakes to Avoid When Disinfecting Nail Tools
Even with the best intentions, people make mistakes when cleaning their nail tools. Here are the most common errors and how to avoid them.
- Skipping the pre-cleaning step: Disinfecting dirty tools does not work properly. Always remove debris before soaking.
- Using too little disinfectant: Your tools must be fully submerged. Partial soaking leaves surfaces unprotected.
- Not soaking long enough: A quick rinse is not disinfection. Follow the recommended soak times for your chosen product.
- Storing tools while still wet: Moisture promotes bacterial growth. Always dry tools completely before putting them away.
- Sharing tools without disinfecting: Even between family members, always disinfect tools before and after each use to prevent cross-contamination.
- Using expired disinfectant: Barbicide and alcohol lose effectiveness over time. Check expiration dates and replace solutions regularly.
One mistake many people make is assuming that washing tools with soap and water is enough. While soap removes surface dirt, it does not kill all pathogens. Always follow up a soap wash with a proper disinfectant soak. This is especially important if you are trying to prevent nail fungus or recover from a previous infection.
How Often Should You Disinfect Your Nail Tools
The short answer is after every single use. But let us break that down a bit more.
After each manicure session: Whether you are doing your nails or someone else’s, disinfect all tools immediately when you are finished. This prevents buildup and keeps your nail care routine sanitary from start to finish.
Before each use: Even if tools were properly stored, a quick disinfectant wipe before use adds an extra layer of protection. This is especially important for clippers and cuticle pushers that directly contact skin.
Deep clean weekly: Once a week, give your tools a more thorough cleaning. Disassemble any removable parts, scrub them individually, and soak them in a stronger solution. This deep clean removes buildup that daily disinfection might miss.
If you use powered tools like electric nail files, maintaining those is also part of your hygiene routine. For tips on powering up and maintaining your equipment, see our article on how to turn on craftsman air compressor to make sure all your tools are in working order.
Expert Tips for Keeping Nail Tools Sterile
Professional nail technicians follow strict sanitation protocols. You can adopt some of their habits at home to elevate your nail tool hygiene game.
Label Your Disinfectant Containers
It is easy to confuse a disinfectant jar with a container of plain water. Label every container clearly with the name of the solution and the date it was last changed. Fresh disinfectant works better, so mark your calendar to replace solutions every two to four weeks.
Use Color-Coded Tools
Some nail enthusiasts assign different tools for different people or different body parts. Using color-coded handles helps prevent accidental cross-use and makes it easier to remember which tools need disinfection between uses.
Keep a Disinfection Log
This might sound excessive, but even a simple notebook where you jot down when you last disinfected your tools can help you stay consistent. Over time, it becomes second nature.
Inspect Tools Before Each Use
Check for rust, dull edges, and cracks before you use any tool. Damaged tools are harder to clean properly and can harbor bacteria in tiny crevices. Replace any tool that shows signs of wear.
When to Replace Your Nail Tools
Even the best disinfection routine has limits. Over time, tools wear out and become less effective to clean. Here are signs that it is time to replace a tool:
- Visible rust or corrosion: Rust can harbor bacteria that no disinfectant fully eliminates. Replace rusted clippers and nippers immediately.
- Dull cutting edges: Blunt tools require more pressure, which can damage nails and skin and create openings for infection.
- Cracked or chipped handles: Cracks trap moisture and bacteria where disinfectants cannot reach.
- Worn file surfaces: Nail files lose their abrasive quality over time. A worn file does not sanitize as effectively because debris gets trapped in the worn surface.
- Loose joints or hinges: Tools with loose parts cannot be cleaned thoroughly and should be replaced.
Investing in high-quality replacement tools is a smart part of your nail tool hygiene strategy. Look for stainless steel instruments, which resist corrosion and are easier to sterilize than cheaper metals.
Conclusion
How to disinfect nail tools for a safe manicure at home is a skill that everyone should have. It is simple, affordable, and incredibly effective at preventing infections and keeping your nails healthy. By following the steps outlined in this guide, you can confidently enjoy your at-home manicure knowing your tools are clean and safe.
Remember the key points: always pre-clean before disinfecting, use the right solution, soak for the recommended time, dry thoroughly, and store properly. Make disinfection a non-negotiable part of your nail care routine, and your tools will serve you well for years to come. Your nails deserve the best care, and that starts with clean instruments.
Frequently Asked Questions
Can I use regular soap and water to disinfect nail tools?
Soap and water remove surface dirt and some bacteria, but they do not fully disinfect. You should always follow up with a proper disinfectant like Barbicide or isopropyl alcohol to kill remaining pathogens. Think of soap as a first step, not the final step.
How long should I soak my nail tools in disinfectant?
Most disinfectants require a 10 to 15-minute soak for full effectiveness. Barbicide typically needs about 10 minutes, while isopropyl alcohol works well with a 10 to 15-minute soak. Always check the product label for specific instructions.
Is it safe to share nail tools if I disinfect them between uses?
Yes, as long as you properly disinfect tools between each use. Soak all tools in an approved disinfectant for the recommended time, rinse, dry completely, and store them separately. This prevents the spread of bacteria and fungal infections between users.
Can I use a dishwasher to clean nail tools?
It is not recommended. Dishwashers use high heat and harsh detergents that can damage the cutting edges and finishes of nail tools. Hand washing with mild soap followed by a proper disinfectant soak is the safest and most effective method.
What is the difference between sanitizing and disinfecting nail tools?
Sanitizing reduces the number of bacteria to a safe level, while disinfecting kills nearly all pathogens including viruses and fungi. For nail tools, disinfecting is the stronger and preferred method. A true sterilize manicure tools process, like autoclaving, goes even further by eliminating all microbial life.
How can I tell if my nail disinfectant needs to be replaced?
Disinfectant solutions lose potency over time. If the solution appears cloudy, discolored, or has debris floating in it, it is time for a fresh batch. As a general rule, replace Barbicide every two to four weeks and isopropyl alcohol every time you notice it becoming dirty or diluted.