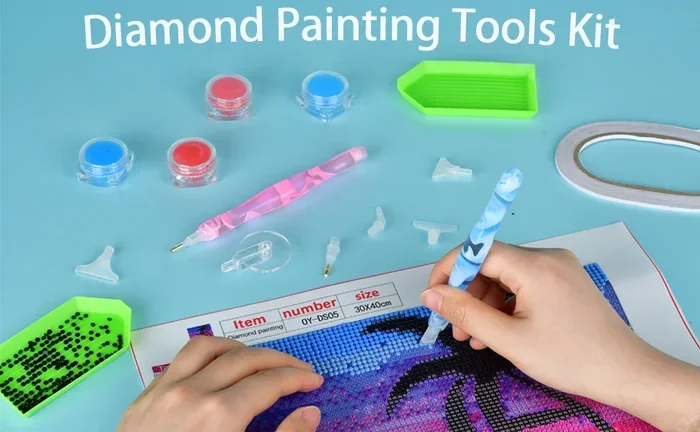
How to Use Diamond Art Tools for Stunning Creations
Diamond art tools make it easy to create beautiful, sparkling artwork at home. This guide covers everything you need to know about using diamond art tools, from essential supplies to pro techniques. Whether you are a beginner or experienced crafter, you will find practical tips to elevate your diamond painting projects.
Key Takeaways
- Right tools matter: Using quality diamond art tools like applicator pens, trays, and wax pads makes the process faster and more enjoyable.
- Setup is key: A clean, organized workspace with proper lighting helps you complete diamond art projects with precision and ease.
- Technique improves results: Using the multi-placer tool and correct pressure on the canvas leads to stunning, professional-looking diamond art.
- Avoid common mistakes: Skipping wax, overfilling the tray, and rushing through sections are the top errors beginners make.
- Display your work proudly: Framing and displaying finished diamond painting pieces adds a personal touch to any room.
📑 Table of Contents
- What Are Diamond Art Tools?
- Essential Diamond Art Tools You Need
- How to Set Up Your Diamond Art Workspace
- Step-by-Step Guide to Using Diamond Art Tools
- Tips and Tricks for Stunning Diamond Art Creations
- Common Mistakes to Avoid When Using Diamond Art Tools
- Creative Ways to Use Your Diamond Art
- Conclusion
What Are Diamond Art Tools?
Diamond art tools are the specialized instruments you use to create diamond painting art. Think of them as your creative sidekick. They help you place tiny resin diamonds onto a sticky canvas with speed and accuracy. The result? A dazzling, gem-like masterpiece that shines bright.
Diamond painting is a lot like paint-by-numbers, but instead of paint, you use tiny sparkly beads called drills. These drills come in round or square shapes. You place them one by one onto a pre-printed canvas. The canvas has a sticky surface covered in a protective film. Each area of the canvas is labeled with a symbol or number that matches a specific diamond color.
The basic idea is simple. You pick up a diamond, place it on the matching symbol, and repeat. But doing this thousands of times by hand would be exhausting. That is where diamond art tools come in. They speed things up and make the process much more fun.
If you have ever tried crafting with beads or rhinestones, you already know how satisfying it feels to see tiny pieces come together into something beautiful. Diamond art tools take that satisfaction to a whole new level. They give you precision and control that bare fingers simply cannot match.
Whether you are looking for a relaxing hobby or a way to create unique wall art, understanding your tools is the first step. Let us dive into what you actually need to get started.
Essential Diamond Art Tools You Need
Before you start any project, you need the right supplies. The good news is that most diamond art starter kits come with everything you need. But knowing what each tool does helps you use them better. Here is a breakdown of the essential diamond art tools every crafter should have.
Diamond Art Pen or Applicator Tool
The diamond art pen is the most important tool in your kit. It looks like a thin pen with a special tip at the end. The tip has a small round head that picks up a single diamond at a time. You simply dip the tip into wax, press it onto a diamond, and place it on the canvas.
Most kits include one or two pens. Having a backup is always smart. If your pen tip gets clogged or damaged, you can swap it out without stopping your project. Some crafters prefer pens with ergonomic grips. These reduce hand fatigue during long sessions.
When choosing a pen, look for one with a comfortable grip and a removable tip. This makes it easy to clean and replace parts. A good diamond art pen should feel smooth in your hand and pick up diamonds consistently.
Diamond Painting Tray
The diamond painting tray is a shallow, flat container with a gentle slope. You pour your diamond beads into the tray and roll the pen tip across the surface. This helps the diamonds stand upright so the pen tip can pick them up easily.
Trays come in different sizes. A larger tray holds more diamonds at once, which saves time. Some trays have color-coded sections. This helps you organize your diamonds by symbol or color. A good tray should be sturdy and easy to clean.
Wax Pad or Adhesive Wax
Wax is what makes the pen tip sticky enough to pick up diamonds. Most kits include small wax pads that you press the pen tip into. The wax coats the tip and gives it just the right amount of grip.
You will go through wax pretty quickly, especially on large projects. It is a good idea to buy extra wax pads or a wax block. Some crafters use a small piece of velvet or felt as a wax alternative. It works just as well and lasts longer.
Multi-Placer Tool
The multi-placer tool is a game-changer for experienced crafters. Instead of picking up one diamond at a time, this tool can grab several diamonds at once. It has multiple small tips arranged in a row or grid pattern.
Using a multi-placer tool can cut your project time in half. It is especially useful for large areas of the same color. If you are working on a big canvas, this tool is a must-have addition to your diamond art tools collection.
Diamond Art Beads and Drills
The beads themselves are the heart of any diamond art project. They are tiny resin rhinestones, usually about 2.5 to 3 millimeters in size. They come in thousands of colors and finishes. Full drill kits cover the entire canvas with diamonds. Partial drill kits only cover certain areas, leaving the rest of the canvas as printed artwork.
Quality beads matter. Cheap beads may be irregular in shape or size. This can cause gaps in your finished design. Look for beads that are uniform and have a smooth, shiny finish. High-quality diamond art beads catch the light beautifully and create a stunning visual effect.
Tweezers and Other Accessories
Tweezers are helpful for picking up individual diamonds in tight spaces. They give you extra precision when working on detailed areas of your canvas. Some kits also include a small scoop or spoon for transferring beads into the tray.
Other useful accessories include a light pad. This illuminates the canvas from underneath, making symbols easier to see. A storage box with compartments helps you organize beads by color. These small extras can make a big difference in your crafting experience.
How to Set Up Your Diamond Art Workspace
Setting up your workspace properly makes a huge difference. A good setup helps you work faster, reduces mistakes, and keeps you comfortable during long crafting sessions. Here is how to get your area ready for using diamond art tools.
Choose a Clean, Flat Surface
Find a table or desk with a flat, stable surface. Diamond beads roll easily, so you do not want your workspace to be uneven. Cover your surface with a soft cloth or towel. This prevents beads from rolling off and getting lost. It also protects the canvas from scratches.
Good Lighting Is Essential
You need bright, even lighting to see the tiny symbols on your canvas clearly. A desk lamp with a daylight bulb works great. Some crafters use a light pad underneath the canvas. This makes the symbols glow through the top layer, which is very helpful for detailed designs.
Organize Your Beads
Sort your beads by symbol or color before you start. You can use small containers, egg cartons, or bead organizers. Label each container with the corresponding symbol number. This saves you a lot of time searching for the right color while you work.
Keep Everything Within Reach
Place your tray, pen, wax pad, and beads within arm’s reach. You do not want to stretch or get up every few minutes. A small caddy or organizer tray works well for keeping your supplies tidy. A clutter-free workspace helps you stay focused and in the creative flow.
Step-by-Step Guide to Using Diamond Art Tools
Now that you have your tools and workspace ready, let us walk through the actual process of using diamond art tools. Follow these steps for a smooth, enjoyable experience.
Step 1: Unroll and Secure Your Canvas
Carefully unroll your diamond painting canvas. Place it on your flat workspace with the printed side facing up. Use books or heavy objects to weigh down the corners. This keeps the canvas flat and prevents it from curling. A flat canvas makes it much easier to place diamonds accurately.
Peel back a small section of the protective film. Start with a manageable area, about 4 to 6 inches wide. Do not peel off the entire film at once. The sticky surface collects dust if left exposed too long.
Step 2: Pour Diamonds Into the Tray
Open the bag of diamonds that matches the symbol you are working on. Pour a small amount into your diamond painting tray. Gently tilt the tray so the diamonds stand upright along the raised edge. This makes it easy to scoop them up with your pen.
Step 3: Load Your Pen With Wax
Press the tip of your applicator pen into the wax pad. You want a thin, even coating on the tip. Too much wax can cause beads to stick in clumps. Too little wax means the pen will not pick up diamonds reliably.
Step 4: Pick Up and Place Diamonds
Press the pen tip gently onto a diamond. It should stick to the tip. Move the pen to the matching symbol on the canvas and press the diamond down firmly. The diamond should stick to the sticky surface of the canvas.
Repeat this process for each symbol in your working area. Work in small sections to keep things manageable. Once a section is complete, peel back more film and continue.
Step 5: Use the Multi-Placer for Large Areas
For big sections of the same color, switch to your multi-placer tool. Load several diamonds at once and place them in a row. This speeds up the process significantly. Just be careful to align the diamonds correctly. The multi-placer works best on flat, open areas.
Step 6: Seal and Display Your Finished Piece
Once all the diamonds are placed, remove the remaining protective film. You can apply a diamond art sealant to keep the beads secure. Frame your finished piece or hang it on the wall. Your sparkling creation is ready to be enjoyed.
Tips and Tricks for Stunning Diamond Art Creations
Getting great results with diamond art tools comes down to a few smart techniques. These tips help you work faster, avoid frustration, and create pieces you will be proud to display.
Work in Good Lighting
Never underestimate the power of good lighting. A well-lit workspace helps you see symbols clearly and place diamonds accurately. Natural light is best, but a quality desk lamp works well too. Some crafters use LED light pads that sit beneath the canvas. This glows the symbols through the top layer for easy visibility.
Start With Small Projects
If you are new to diamond painting, start with a small kit. A 30×30 cm canvas is a great first project. It lets you learn your diamond art tools without feeling overwhelmed. As you build confidence, you can move on to larger, more detailed designs.
Use a Rolling Technique
When loading your pen, roll the tip across the tray rather than pressing straight down. This helps the pen pick up just one diamond at a time. It prevents clumping and keeps your workflow smooth. Practice this a few times before you start on the actual canvas.
Take Breaks to Rest Your Hands
Diamond painting involves repetitive hand movements. After 30 to 45 minutes, take a short break. Stretch your fingers and shake out your hand. This prevents cramping and keeps your precision sharp. Comfortable hands mean cleaner, more accurate diamond placement.
Listen to Music or Podcasts
Diamond painting is a relaxing activity, and music makes it even better. Create a playlist of your favorite songs or listen to a podcast while you work. This keeps you entertained and helps the time pass quickly. Many crafters say it is one of the best parts of the hobby.
Check Your Work Regularly
Every few rows, step back and look at your work from a distance. This helps you spot any misplaced diamonds early. Fixing a mistake is much easier when you catch it quickly. Use tweezers to gently lift and reposition any diamonds that are off-center.
Store Leftover Beads Properly
Keep your leftover beads in labeled containers. Store them in a cool, dry place away from direct sunlight. Resin beads can fade or become brittle if exposed to heat. Proper storage ensures your beads stay in great condition for future projects.
Common Mistakes to Avoid When Using Diamond Art Tools
Even experienced crafters make mistakes. Knowing what to avoid saves you time and frustration. Here are the most common errors people make with diamond art tools and how to prevent them.
Skipping the Wax
This is the number one mistake beginners make. Without wax, your pen tip will not pick up diamonds. Always check that your pen has a fresh wax coating before you start placing beads. Reapply wax every few diamonds to maintain a strong grip.
Peeling Too Much Film at Once
It is tempting to peel the entire protective film off the canvas. Resist that urge. Exposed sticky surfaces attract dust and debris. This can interfere with diamond adhesion. Peel only what you are working on, and keep the rest covered.
Overfilling the Tray
Pouring too many diamonds into the tray causes them to tangle and clump. This slows you down and wastes beads. Add a small amount at a time and refill as needed. A little goes a long way with diamond art beads.
Placing Diamonds Too Quickly
Speed is not always your friend in diamond painting. Rushing leads to misaligned diamonds and crooked rows. Take your time, especially on detailed sections. Precision matters more than speed when it comes to creating beautiful diamond art.
Ignoring the Canvas Alignment
Always make sure your canvas is straight and properly aligned. If the canvas shifts while you work, your diamonds will end up in the wrong positions. Use tape or weights to keep the canvas secure in place throughout the project.
Not Checking Diamond Colors
It is easy to grab the wrong color bead, especially when working with similar shades. Always double-check the symbol and color code before placing a diamond. Mixing up colors can ruin an otherwise perfect design.
Creative Ways to Use Your Diamond Art
Once you finish a diamond painting, the fun does not stop there. There are many creative ways to display and use your artwork. You can frame it as wall art, create custom coasters, or make decorative pillows. Some crafters turn their diamond art into gift items. A framed diamond painting makes a thoughtful, handmade present.
If you enjoy other creative tools, you might also like exploring a word art generator to create text-based designs that complement your diamond art pieces. For those who enjoy pixel and grid-based art, an ASCII art generator offers a fun digital twist on the same concept of arranging small elements into a larger picture. And if you ever find yourself unsure what to create next, an what to draw generator can spark fresh ideas for your diamond art projects.
You can also combine your diamond art with other crafts. Try mounting finished pieces onto greeting cards or gift boxes. Create a mosaic-style wall by arranging multiple small diamond paintings together. The possibilities are endless when you have the right diamond art tools and a little creativity.
Some crafters even use their diamond art skills to make custom home decor. Think diamond-painted picture frames, decorative trays, or wall hangings. These personalized items add warmth and character to any space. They also make excellent gifts for friends and family.
Conclusion
Diamond art tools open up a world of creativity and relaxation. With the right supplies and a little practice, anyone can create breathtaking diamond art. The process is simple, but the results are extraordinary. You end up with a beautiful, sparkling piece of art that you made with your own hands.
Remember to start with the basics. Get a quality pen, tray, wax pad, and a well-organized workspace. Follow the steps carefully, take your time, and enjoy the process. Avoid the common mistakes we discussed, and you will be well on your way to creating stunning diamond art pieces.
Diamond painting is more than just a hobby. It is a way to unwind, express your creativity, and produce something truly unique. Whether you make art for yourself or as gifts for others, the satisfaction of completing a diamond painting is hard to beat. Pick up your diamond art tools today and start creating your own sparkling masterpieces.
Frequently Asked Questions
What are the basic diamond art tools I need to get started?
To get started with diamond art, you need a diamond art pen or applicator tool, a diamond painting tray, adhesive wax or a wax pad, and of course diamond beads or drills. Most starter kits include all of these essentials. A pair of tweezers and a light pad are helpful extras that make the process easier and more precise.
How do I choose the right diamond art pen?
Look for a pen with a comfortable, ergonomic grip and a removable tip. The tip should pick up diamonds consistently without dropping them. Pens with a rubber or silicone grip reduce hand fatigue during long sessions. If you are working on large projects, consider getting a multi-placer tool to speed things up significantly.
Can I use diamond art tools for other crafts besides diamond painting?
Yes, many crafters use diamond art tools for other projects. The applicator pen and tray work well for placing small rhinestones, beads, and sequins on various surfaces. You can use them for decorating phone cases, picture frames, greeting cards, and more. The precision of these tools makes them versatile for any small-bead craft project.
How do I keep my diamond beads organized?
Use small labeled containers or bead organizers to sort your diamonds by symbol or color. Egg cartons work as a budget-friendly alternative. Some crafters use multi-compartment storage boxes with dividers. Always label each container clearly so you can find the right color quickly while working on your canvas.
What is the difference between full drill and partial drill diamond kits?
A full drill kit covers the entire canvas with diamonds, creating a complete sparkling design. A partial drill kit only covers certain sections of the canvas, leaving the rest as a printed image. Full drill kits offer a more immersive diamond art experience, while partial drill kits are great for beginners or those who want a mix of diamond and printed artwork.
How long does it take to complete a diamond art project?
The time depends on the size of the canvas and your experience level. A small 30×30 cm kit might take a few evenings to finish. Larger canvases of 60×80 cm or more can take several weeks of regular crafting sessions. Working in focused 30 to 45 minute blocks keeps the process enjoyable and prevents hand fatigue.