How to Sharpen Carving Tools for Beautiful Woodwork
Sharpening your carving tools is the single most important skill for any woodworker who wants clean cuts and professional results. This guide covers everything from choosing the right sharpening stones to maintaining a perfect edge on your carving gouges and chisels. Whether you are a beginner or a seasoned carver, these simple methods will keep your hand tools cutting like butter.
There is nothing more frustrating than trying to carve wood with a dull tool. Every stroke feels like pushing sandpaper against the grain, and the results look rough and uneven. If you have ever wondered how to sharpen carving tools the right way, you are in the right place.
Sharp carving tools transform woodworking from a chore into a joy. A properly sharpened gouge or chisel glides through wood with almost no effort, leaving behind clean, smooth cuts that showcase the natural beauty of the grain. Whether you carve spoons, relief sculptures, or decorative details, your results depend heavily on edge quality.
This guide walks you through every step of the sharpening process in plain, simple language. We will cover the tools you need, the different methods available, and common mistakes that dull your edges faster than they should. By the end, you will feel confident sharpening carving chisels and gouges like a seasoned craftsperson.
Key Takeaways
- Sharpen regularly: Frequent light sharpening keeps edges longer and makes the process faster each time.
- Use the right grit sequence: Start coarse and work your way up to fine grits for a polished razor edge.
- Maintain your strop: A leather strop with compound is the best way to touch up your edge between full sharpenings.
- Check your bevel angle: Most carving tools work best at a 25 to 30 degree bevel angle depending on the wood and cut.
- Test as you go: The paper test and thumbnail test help you know exactly when your tool is sharp enough.
- Store tools properly: How you store your carving tools affects how long your edge stays sharp.
📑 Table of Contents
- Why Sharp Carving Tools Make All the Difference
- Understanding Your Carving Tools
- The Best Sharpening Methods for Carving Tools
- Step-by-Step Guide to Sharpening Carving Tools
- Maintaining Your Sharp Edge
- Common Sharpening Mistakes to Avoid
- Quick Tips for Perfect Sharpening
- Expert Insights on Tool Sharpening
- Conclusion
Why Sharp Carving Tools Make All the Difference
Sharp tools are safe tools. It might sound backwards, but a dull blade requires more force, which leads to slipping and accidents. A razor sharp edge bites into the wood cleanly, giving you full control over every cut.
Here is what sharp carving tools actually do for your work:
- Cleaner cuts: Sharp tools slice through wood fibers instead of tearing them, leaving a smooth surface that needs less sanding.
- Better control: You can make delicate, precise cuts when the tool responds instantly to your hand pressure.
- Less fatigue: Sharp tools require far less physical effort, so you can carve for longer without sore hands.
- Longer tool life: Proper sharpening reduces unnecessary wear on your tool steel, so your tools last for years.
- More enjoyment: There is a real pleasure in working with tools that feel alive in your hands.
If you use pneumatic carving tools or air-powered systems, you want to make sure your setup runs smoothly. Knowing how to start an air compressor properly ensures consistent power delivery, which matters when your tools depend on steady airflow for performance.
Understanding Your Carving Tools
Before you start sharpening, it helps to know what you are working with. Different carving tools have different edge profiles, and each one needs a slightly different approach.
Carving Gouges
Gouges have curved cutting edges that scoop out wood. They come in many sweep numbers, from shallow sweeps (almost flat) to deep sweeps (very curved). The sweep number tells you how much curve the edge has. Deeper gouges need more careful sharpening because the curved edge is harder to maintain evenly.
Carving Chisels
Chisels have straight cutting edges and are used for making flat cuts and cleaning up joints. A bench chisel for carving typically has a sturdier blade than a woodworking chisel. The flat edge is simpler to sharpen, but you still need to keep the bevel angle consistent along the full length of the blade.
V-Tools and Parting Tools
V-tools create grooves and lines. Their edges meet at an angle, usually 60 or 90 degrees. Sharpening these requires attention to both sides of the V so that the center line stays crisp and even. Parting tools work similarly but have a wider, flatter profile.
Skew Chisels and Detail Tools
Skew chisels have an angled edge that allows you to reach tight spots. Detail tools are small and delicate, and they need extra care during sharpening because the thin blade can overheat easily if you grind too aggressively.
The Best Sharpening Methods for Carving Tools
Several methods work well for how to sharpen carving tools. Each has its own strengths, and many carvers use a combination of methods for the best results.
Method 1: Sharpening Stones (Whetstones)
Whetstones are the most popular choice among wood carvers. They come in different grit levels, typically ranging from coarse (around 220 grit) to extra fine (3000 grit or higher).
Here is how to use a whetstone:
- Soak the stone in water for 10 to 15 minutes before use.
- Place the stone on a flat surface, ideally on a damp towel to prevent slipping.
- Hold your tool at the correct bevel angle (usually 25 to 30 degrees for carving tools).
- Slide the blade across the stone in a sweeping motion, covering the entire edge.
- Flip the tool and repeat on the other side, keeping the angle consistent.
- Progress from coarse grit to finer grits, repeating until you achieve a polished edge.
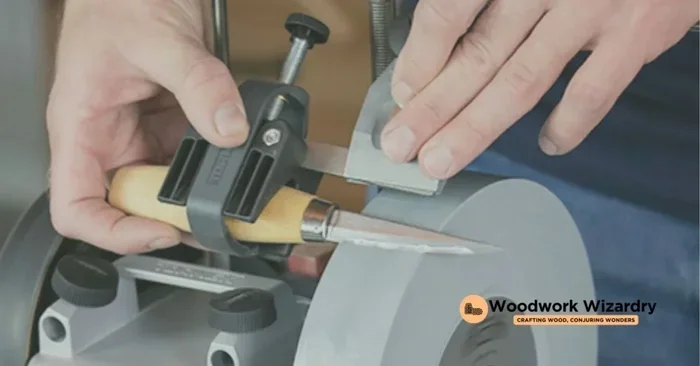
A honing guide can help beginners maintain a steady angle. Once you develop a feel for it, many carvers prefer freehand sharpening because it gives them more control over the edge profile.
Method 2: Diamond Sharpeners
Diamond sharpeners use tiny diamond particles bonded to a metal plate. They cut fast and stay flat longer than whetstones. They work well for tool steel that is hard to wear down, which is common in quality carving tools.
Diamond sharpeners come in different grits too. Start with a coarse diamond plate (around 400 grit) and finish on a fine plate (1200 grit or higher). The advantage is that you do not need to soak them, and they work with both water and dry sharpening.
Method 3: Leather Stropping
Stropping is the final step that polishes your edge to a mirror finish. A leather strop is a strip of leather stretched on a flat board. You apply sharpening compound to the leather and draw your tool across it with the bevel facing down.
Stropping does not remove metal. Instead, it realigns the very finest edge particles and removes the tiny burr left from stone sharpening. This is why many carvers strop their tools between full sharpening sessions. A quick pass on the strop before each carving session keeps your tools feeling like new.
Method 4: Electric Sharpeners
Electric sharpeners offer speed and convenience. They spin abrasive wheels that grind and polish your edge automatically. However, they can remove more metal than you want, especially on delicate carving tools. If you use an electric sharpener, go slow and light to avoid thinning your blades.
For power tool owners, keeping your equipment in good shape matters too. If you ever need to handle an old air compressor from your workshop, proper disposal or repurposing keeps your workspace safe and organized while you focus on your carving.
Step-by-Step Guide to Sharpening Carving Tools
Now let us put it all together. Follow this step-by-step process each time you sharpen your carving tools.
Step 1: Inspect the Blade
Look closely at the edge under good light. Run your fingernail across it. If your nail catches, the edge is still present but needs work. If it glides without catching, the tool is completely dull and needs more aggressive sharpening first.
Step 2: Choose Your Starting Grit
For very dull tools, start with a coarse stone around 220 to 400 grit. For tools that just need a touch-up, start at 1000 grit. The goal is to remove the minimum amount of metal necessary to restore a sharp edge.
Step 3: Establish the Bevel Angle
Most carving tools work best at a 25 to 30 degree angle. If you are unsure, hold the tool so the back edge sits flat on the stone and tilt the front until the bevel lies flat. This is your angle. A sharpening jig can lock this angle in place for repeatable results every time.
Step 4: Grind the Bevel
Place the bevel flat on the stone and push the tool forward in a smooth, even motion. Lift the tool on the return stroke to avoid dragging grit backward across the edge. Repeat for 10 to 20 strokes, then check your progress.
You will feel a slight change in texture as the edge begins to form. You may also notice a small burr forming on the backside of the blade. This is normal and tells you the edge is developing.
Step 5: Sharpen the Back (Flat Side)
Flip the tool over and place the flat back side on the stone. Make a few light passes to remove the burr and create a flat area behind the edge. This flat area supports the cutting edge and makes it stronger.
Step 6: Progress to Finer Grits
Move to a medium stone (around 1000 grit) and repeat the process. Then go to a fine stone (3000 grit or higher). Each grit removes the scratches left by the previous stone. The more grits you work through, the sharper and more polished your edge becomes.
Step 7: Strop the Edge
Apply a thin layer of sharpening compound to your leather strop. Draw the bevel across the strop 10 to 15 times, then strop the back side a few times. This removes any remaining burr and polishes the edge to a mirror finish.
Step 8: Test the Edge
Try the paper test: hold a piece of printer paper vertically and draw your tool across it. A sharp tool will slice through cleanly with almost no pressure. Try the thumbnail test too: gently run the edge across your thumbnail. A sharp tool will bite in slightly and feel crisp, not slide or crush.
If your tools are connected to any pneumatic systems, troubleshooting power issues early helps prevent frustration mid-project. Understanding how to reset a compressor quickly can save you time and keep your carving sessions flowing without interruption.
Maintaining Your Sharp Edge
Sharpening is only half the battle. Proper maintenance keeps your carving tools cutting well between full sharpening sessions.
Store Tools Properly
Never toss your carving tools into a drawer where they knock against other metal objects. Use a tool roll, a wooden rack, or individual blade guards. Even a small nick from bumping against another tool can ruin a freshly sharpened edge.
Clean After Every Use
Wipe your tools with a clean cloth after carving. Wood resin and sap build up on the blade and can interfere with the edge. A light coat of mineral oil on carbon steel tools prevents rust and keeps them sliding smoothly through the wood.
Strop Before Each Session
Get into the habit of giving your tools a few quick passes on the strop before you start carving. This takes less than a minute and makes a huge difference in cutting performance.
Sharpen Before the Edge Gets Too Dull
Many carvers wait until their tools feel completely dull before sharpening. By then, the edge has worn down significantly and requires more work to restore. Regular light sharpening is faster and removes less material from your blades.
Know When to Replace
Even with perfect care, carving tools eventually wear out. If you find yourself constantly grinding away metal and never achieving a sharp edge, the blade may be too thin to save. At that point, it is time to retire the tool or replace it. You can always find good uses for retired tools, but knowing when to move on keeps your carving set efficient.
For those who work with broader workshop equipment, understanding how to troubleshoot an AC compressor can help you diagnose issues across your tool collection, since many principles of tool care and maintenance overlap between different types of equipment.
Common Sharpening Mistakes to Avoid
Even experienced carvers sometimes make sharpening errors. Here are the most common mistakes and how to avoid them.
- Using the wrong angle: If your bevel angle is too steep or too shallow, the edge will not cut properly. Stick to 25 to 30 degrees for most carving tools and use a jig until you build muscle memory.
- Skipping grit levels: Jumping from a coarse stone straight to a fine stone leaves deep scratches in the edge. Always progress through the grits in order.
- Pressing too hard: Let the abrasive do the work. Pushing too hard creates heat that can soften your tool steel and ruin the edge.
- Sharpening dry stones: Most whetstones need water or oil to work properly. Dry sharpening clogs the pores and reduces cutting effectiveness.
- Ignoring the back of the blade: The flat back side supports your cutting edge. Neglecting it leads to an unbalanced edge that dulls quickly.
- Not testing the edge: Always test after sharpening. If the edge is not performing, go back and repeat the process rather than starting your carving project with a subpar edge.
Quick Tips for Perfect Sharpening
Keep these quick tips in mind every time you sharpen your carving tools:
- Mark your bevel angle with a marker pen so you can see exactly where the stone is making contact.
- Use a shallow dish of water to keep your whetstone wet without over-soaking it.
- Count your strokes so you apply equal pressure to both sides of the blade.
- Keep your sharpening area well lit so you can spot burrs and edge inconsistencies easily.
- Invest in a quality strop. It costs very little but extends the time between full sharpenings dramatically.
- Take short breaks to avoid hand fatigue, which leads to inconsistent angles.
Expert Insights on Tool Sharpening
Experienced carvers agree that sharpening is a skill that improves with practice. At first, it may feel slow and technical, but within a few weeks, most people develop a rhythm that takes only minutes per session.
The best carvers also emphasize that tool steel quality matters. High carbon steel holds an edge longer and is more forgiving during sharpening. Tool steel that is too soft requires frequent touch-ups, while steel that is too hard can be difficult to sharpen without specialized equipment. Finding the right balance is part of what makes woodworking so rewarding.
Another expert tip: pay attention to the sound and feel of sharpening. A sharp tool on a stone produces a smooth, consistent sound. A dull tool or one with an uneven edge produces scratching or catching. Your hands can feel the difference too. Learning to trust these sensory cues puts you on the path to mastery.
Conclusion
Learning how to sharpen carving tools is one of the most valuable skills you can develop as a woodworker. It saves you money, improves your results, and makes every carving session more enjoyable. With the right stones, a good strop, and a little practice, you can keep your carving gouges and chisels cutting like new for years to come.
Start with the basics covered in this guide, and build your confidence one session at a time. Remember to sharpen regularly, strop before each use, and store your tools with care. Your carving tools are an investment, and proper maintenance pays off in every beautiful piece of woodwork you create.
Grab your sharpening stones, pick up your favorite carving tool, and give it a fresh edge today. The difference in your work will speak for itself.
Frequently Asked Questions
How often should I sharpen my carving tools?
It depends on how often you carve and what wood you use. Most carvers sharpen their tools at the start of each session and give them a quick strop halfway through long projects. Hard woods like oak dull edges faster than soft woods like basswood, so adjust your schedule based on the material you are working with.
Can I use a kitchen knife sharpener for carving tools?
It is not recommended. Kitchen sharpeners are designed for the angles and blade profiles of kitchen knives, not carving gouges and chisels. The curved edges of carving tools need specialized stones or jigs to achieve the right bevel. Using the wrong sharpener can damage your tools or create an uneven edge.
What is the best grit sequence for sharpening carving tools?
A good starting sequence is 220 grit (coarse), 400 grit, 1000 grit, and 3000 grit (fine). If your tools are only slightly dull, you can skip the coarse stones and start at 1000 grit. Always finish with a leather strop and polishing compound for the smoothest possible edge.
How do I know if my carving tool is sharp enough?
Try the paper test by slicing a piece of printer paper. A sharp tool cuts through cleanly with light pressure. You can also do the thumbnail test by gently drawing the edge across your thumbnail. A sharp tool will bite in slightly and feel crisp, while a dull tool will slide without cutting.
Can I sharpen carving tools without a honing guide?
Yes, many experienced carvers sharpen freehand. A honing guide helps beginners maintain a consistent bevel angle, which is the biggest challenge when learning. Once you develop the muscle memory, freehand sharpening actually gives you more control over the edge profile and takes less time overall.
Does the type of wood affect how fast my carving tools dull?
Absolutely. Hard, abrasive woods like oak, walnut, and rosewood dull edges much faster than soft woods like pine, basswood, or butternut. If you carve a mix of woods, plan to sharpen more frequently when working with harder species. This is normal and expected, not a sign that your tools are low quality.