How to Clean Rusty Garden Tools and Make Them Shine
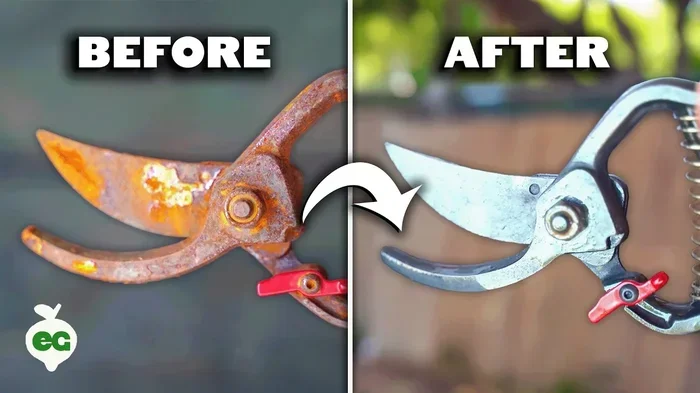
Dirty, rusty garden tools don’t have to be thrown away. With the right cleaning methods, you can bring even the most corroded tools back to life. This guide covers everything from vinegar soaks to commercial rust removers, so your tools stay sharp and ready for the next gardening season.
Key Takeaways
- Vinegar soaks are the most affordable and effective way to remove light to moderate rust from garden tools.
- WD-40 and lemon juice work great as natural rust fighters for smaller hand tools.
- Preventing rust is just as important as removing it — proper storage and oiling make a huge difference.
- Using an air compressor after cleaning helps dry tools thoroughly and prevents future corrosion.
- Sharpening and oiling tools after rust removal extends their lifespan by years.
📑 Table of Contents
- Why You Should Clean Rusty Garden Tools Instead of Replacing Them
- Gathering Your Supplies for Rust Removal
- Step-by-Step Methods to Clean Rusty Garden Tools
- How to Prepare and Protect Your Tools After Cleaning
- Preventing Rust Before It Starts
- Common Mistakes to Avoid When Cleaning Rusty Tools
- Expert Tips for Long-Lasting Tool Performance
- When It’s Time to Replace Instead of Repair
- Conclusion
Why You Should Clean Rusty Garden Tools Instead of Replacing Them
Garden tools are expensive. A good set of pruners, shears, and shovels can easily cost you a few hundred dollars. So when rust starts showing up, your first instinct might be to toss them and buy new ones. But here’s the thing — cleaning rusty garden tools is almost always cheaper, easier, and better for the environment.
Rust is just iron oxide. It forms when metal tools are exposed to moisture and oxygen over time. And while a little surface rust isn’t the end of the world, heavy rust can weaken your tools and make them unsafe or ineffective. The good news? Most rust can be removed with items you already have at home.
In this guide, we’ll walk you through every method for removing rust from garden tools, from simple household solutions to more heavy-duty approaches. We’ll also cover how to prevent rust from coming back and how to maintain your tools so they last for years.
Gathering Your Supplies for Rust Removal
Before you start, it helps to have everything ready. You don’t need anything fancy, but having the right supplies on hand makes the process much smoother.
Basic Household Items You Probably Already Own
- White vinegar — the MVP of rust removal
- Baking soda — great for light rust and polishing
- Lemon juice — a natural acid that cuts through rust
- Salt — boosts the rust-fighting power of vinegar and lemon
- Dish soap — for initial cleaning and degreasing
- Toothbrush or stiff brush — for scrubbing tight spots
- Old rags or towels — for drying and wiping
Specialized Rust Removal Tools
- Steel wool — perfect for scrubbing off stubborn rust
- Wire brush — great for heavy rust on larger tools
- Sandpaper (various grits) — smooths out rust damage
- Rust converter — chemically transforms rust into a stable surface
- WD-40 or similar lubricant — removes rust and prevents new rust
Once you have your supplies gathered, you’re ready to start the actual cleaning process. And trust us, it’s way more satisfying than you might expect.
Step-by-Step Methods to Clean Rusty Garden Tools
Different levels of rust call for different approaches. Here are the most effective methods, ranked from gentlest to most aggressive.
Method 1: The Vinegar Soak (Best for Light to Moderate Rust)
The vinegar soak is the most popular method for a reason. It works, it’s cheap, and it requires almost no effort. White vinegar contains acetic acid, which dissolves rust without damaging the underlying metal.
Here’s how to do it:
- Fill a bucket or container with enough white vinegar to fully submerge the rusted parts of your tool.
- Place your rusty garden tools into the vinegar solution.
- Let them soak for anywhere from 1 to 8 hours, depending on how heavy the rust is.
- Remove the tools and scrub off the loosened rust with steel wool or a wire brush.
- Rinse the tools with clean water and dry them completely.
Pro tip: Add a splash of salt to the vinegar for extra rust-fighting power. The salt acts as a mild abrasive and speeds up the chemical reaction.
After the soak, you’ll notice the rust has softened significantly. A quick scrub with steel wool or a wire brush will remove most of what’s left. For tools with intricate designs or tight spaces, an old toothbrush works wonders in those hard-to-reach spots.
Method 2: The Baking Soda Paste (Best for Light Surface Rust)
If your tools only have a thin layer of surface rust, the baking soda paste is your best friend. It’s gentle enough not to scratch the metal but strong enough to handle light corrosion.
Here’s the process:
- Mix three parts baking soda with one part water to form a thick paste.
- Apply the paste directly to the rusted areas.
- Let it sit for about 30 minutes.
- Scrub with a damp cloth or soft brush in circular motions.
- Rinse and dry thoroughly.
This method works well for tools like hand trowels, pruners, and garden forks. It won’t handle heavy rust, but for maintenance-level cleaning, it’s perfect. You can repeat this process as often as needed to keep your tools looking great.
Method 3: The Lemon and Salt Technique (Best for Small Tools)
Lemon juice is a natural acid, just like vinegar. When combined with salt, it creates a powerful rust-fighting duo that works especially well on smaller hand tools.
To use this method:
- Squeeze fresh lemon juice over the rusted area.
- Sprinkle a generous amount of salt on top.
- Let the mixture sit for 2 to 3 hours.
- Scrub with the lemon rind or a soft brush.
- Rinse and dry completely.
This method smells great and is completely natural. It’s also a wonderful option if you’re working indoors and want to avoid the strong smell of vinegar.
Method 4: WD-40 Soak (Best for Stubborn Rust)
WD-40 is a multi-purpose product that does more than just lubricate. It’s also an effective rust remover. The solvent in WD-40 penetrates rust and breaks it down at the molecular level.
To use WD-40 for rust removal:
- Spray WD-40 directly onto the rusted areas.
- Let it penetrate for 10 to 15 minutes.
- Scrub with steel wool or a wire brush.
- Wipe clean and repeat if necessary.
WD-40 works well on tools with moderate rust buildup. It’s also a great option because it leaves a protective layer on the metal after cleaning, which helps prevent future rust. If you’re using an air compressor to speed up the drying process afterward, make sure you know how to properly start your air compressor for safe operation.
Method 5: Commercial Rust Removers (Best for Heavy Rust)
When home remedies aren’t cutting it, commercial rust removers are your next step. Products like Evapo-Rust, Naval Jelly, and Ospho are specifically designed to dissolve heavy rust without damaging the base metal.
Here’s what to expect:
- Most commercial removers work by chemically converting rust into a stable compound.
- They typically require 15 minutes to several hours of application time.
- They’re safe for most metal types when used as directed.
- They can be more expensive than household methods but are far more effective on severe rust.
Always read the product instructions carefully and wear gloves when handling commercial chemicals. These products are powerful and should be treated with respect.
How to Prepare and Protect Your Tools After Cleaning
Removing rust is only half the battle. If you don’t properly prepare and protect your tools afterward, the rust will come back — sometimes faster than before.
Drying Your Tools Thoroughly
Moisture is the number one cause of rust. So after cleaning, it’s absolutely critical to dry your tools completely. Here are a few ways to do it effectively:
- Wipe each tool with a clean, dry rag immediately after rinsing.
- Use a clean cloth to get into crevices and joints where water can hide.
- Let tools air dry in a warm, ventilated area for at least 30 minutes.
- For a thorough dry, use an air compressor to blow moisture out of every nook and cranny.
If you have a Husky air compressor, this is a great time to put it to work. A few quick bursts of compressed air will remove every last drop of moisture from your freshly cleaned tools. Just make sure you know how to properly refill your air compressor before you start so you don’t run out of pressure mid-job.
Sharpening Your Garden Tools
Clean, sharp tools make gardening easier and more enjoyable. After removing rust, take a moment to sharpen your tools with a file or sharpening stone. This is especially important for pruners, shears, shovels, and hoes.
Sharp tools make cleaner cuts, which helps plants heal faster and reduces the chance of disease. It’s a simple step that makes a huge difference in your garden.
Oiling and Storing Tools Properly
Once your tools are clean, dry, and sharp, it’s time to protect them. Apply a thin coat of mineral oil, camellia oil, or even WD-40 to all metal surfaces. This creates a barrier against moisture and oxygen — the two things that cause rust.
For storage, follow these guidelines:
- Store tools in a dry, sheltered area like a shed or garage.
- Hang tools on hooks rather than letting them sit on damp floors.
- Consider using a tool rack or magnetic strip for easy access and air circulation.
- Never leave tools outside in the rain or dew.
Preventing Rust Before It Starts
The best way to deal with rust is to never let it form in the first place. A little preventive maintenance goes a long way toward keeping your garden tools in top shape.
Clean Tools After Every Use
Get into the habit of cleaning your tools after each gardening session. A quick rinse with a garden hose followed by a thorough dry removes soil and moisture before they have a chance to cause corrosion. This simple 2-minute routine can add years to the life of your tools.
Oil Metal Surfaces Regularly
Apply a light coat of oil to all metal parts at least once a month during the gardening season. Focus on areas where rust typically starts — joints, hinges, and cutting edges. A spray bottle filled with a mix of water and a few drops of dish soap makes applying oil quick and easy.
Use Tool Covers or Storage Cases
Investing in tool covers or storage cases protects your tools from humidity and condensation. These are especially useful for tools you don’t use frequently, like seasonal equipment. A simple tool bag or toolbox with a tight-fitting lid can make a big difference.
Control Humidity in Your Storage Area
If your shed or garage tends to be damp, consider using a dehumidifier or placing moisture-absorbing packets near your tool storage. Keeping the environment dry is one of the most effective ways to prevent garden tool rust from forming.
Common Mistakes to Avoid When Cleaning Rusty Tools
Even with the best intentions, people often make mistakes that can damage their tools or make the rust problem worse. Here are a few to watch out for:
- Using abrasive pads on delicate tools. Steel wool and wire brushes are great for sturdy shovels and hoes, but they can damage the finish on pruners and shears. Use a softer approach for delicate tools.
- Leaving tools wet after cleaning. This is the fastest way to bring rust right back. Always dry tools thoroughly before storing them.
- Soaking tools with wooden handles in vinegar. Vinegar can break down wood over time. Only submerge the metal parts, or wrap a cloth soaked in vinegar around the rusted area instead.
- Skipping the oiling step. Cleaning alone doesn’t protect your tools. Always apply oil after removing rust to prevent it from returning.
- Using bleach to remove rust. Bleach can actually accelerate rust formation on metal. Stick to vinegar, lemon, or dedicated rust removers instead.
Expert Tips for Long-Lasting Tool Performance
Here are some pro tips that experienced gardeners swear by:
- Clean your tools at the end of each season. A thorough end-of-season cleaning session prevents rust from building up over the winter months.
- Apply a thin layer of paste wax to metal surfaces. Wax creates an excellent moisture barrier and is especially good for shovels and spades.
- Use sandpaper to smooth out pitting after rust removal. Start with 120-grit sandpaper and work your way up to 400-grit for a smooth finish.
- Consider a rust converter for heavily pitted tools. Rust converters chemically transform rust into a paintable surface, giving old tools a second life.
- Keep a bucket of soapy water near your garden. This makes quick post-use cleaning effortless and helps build a consistent habit.
When It’s Time to Replace Instead of Repair
Not every rusty tool can be saved. Here are signs that it’s time to let go and invest in a replacement:
- The tool handle is cracked, split, or rotting.
- The metal is so corroded that it has lost its structural integrity.
- The cutting edge is beyond repair, even after sharpening.
- The tool has been repaired multiple times and keeps failing.
- Rust has spread to moving parts, preventing the tool from functioning properly.
When you do replace old tools, consider high-quality options that are designed to resist rust. Tools made with stainless steel or coated with protective finishes will save you time and money in the long run.
Conclusion
Cleaning rusty garden tools doesn’t have to be a daunting chore. With the right methods and a little elbow grease, you can restore your favorite tools to working condition and keep them rust-free for years to come. Whether you prefer the simplicity of a vinegar soak or the power of a commercial rust remover, the key is to act quickly and consistently.
Remember to always dry your tools thoroughly after cleaning, apply a protective oil coat, and store them in a dry place. These small habits make all the difference. Your garden tools work hard for you — taking care of them is the least you can do.
Start with the method that fits your rust level and supplies on hand. You’ll be amazed at how good your tools look and how much easier gardening becomes with clean, sharp, well-maintained equipment. Happy gardening!
Frequently Asked Questions
What is the fastest way to remove rust from garden tools?
The fastest method is using a commercial rust remover or a WD-40 soak. Both work within 10 to 15 minutes for moderate rust. For heavy rust, a vinegar soak overnight followed by scrubbing with steel wool delivers the quickest results.
Can I use vinegar to clean rusty garden tools with wooden handles?
Yes, but be careful. Only soak the metal parts or wrap a vinegar-soaked cloth around the rusted areas. Avoid submerging the entire tool, as vinegar can damage wood over time. Always dry wooden handles thoroughly after cleaning.
How often should I clean my garden tools to prevent rust?
You should clean and dry your tools after every use. A deeper maintenance session with oiling and sharpening should be done at least once a month during the gardening season and thoroughly at the end of each season.
Is WD-40 safe to use on garden tools that touch plants or food?
WD-40 is safe for tool maintenance, but if the tool comes into contact with edible plants, wipe off any residue before use. For food-safe tool care, use mineral oil or camellia oil as an alternative protective coating.
What household items work best for light rust removal?
White vinegar, baking soda, lemon juice, and salt are all excellent household options for light rust removal. Each works through natural acid or mild abrasion to dissolve surface corrosion without harsh chemicals.
Can rust damage be permanent on garden tools?
In most cases, no. Even heavily rusted tools can often be restored with the right method. However, if the rust has eaten through the metal or compromised the structural integrity, the damage may be permanent and replacement is the safest option.