AC Compressor Clutch Replacement Guide for Beginners
This AC compressor clutch replacement guide walks beginners through the entire process with clear, simple steps. You will learn how to spot warning signs, gather the right tools, and save money on professional repairs. We cover safety tips, common mistakes, and real-world examples to make your DIY project a success.
Your car’s air conditioning system works hard to keep you cool on hot days. But when the AC compressor clutch starts failing, that cool air quickly becomes warm air. If you have noticed strange noises, a clutch that won’t engage, or an AC that blows warm air, it might be time to learn about AC compressor clutch replacement.
This guide is designed for beginners who want to tackle this repair themselves. We will walk you through everything from identifying the problem to completing the replacement step by step. You do not need to be a professional mechanic to get this job done right. With the right tools, a little patience, and our guidance, you can replace your AC compressor clutch and save a lot of money in the process.
Let us dive into what the AC compressor clutch does, how to tell when it is going bad, and exactly how to replace it. Whether you drive a sedan, truck, or SUV, the basic process is very similar across most vehicles. By the end of this article, you will feel confident enough to roll up your sleeves and get started.
Key Takeaways
- Know the Symptoms: Recognizing early signs of a failing AC compressor clutch can prevent costly damage to your entire air conditioning system.
- Save Money with DIY: Replacing the clutch yourself can cut repair costs significantly compared to shop labor rates.
- Safety First: Always disconnect the battery and relieve refrigerant pressure before starting any work on your AC system.
- Right Tools Matter: Having the correct tools and replacement parts ready saves time and prevents frustrating mid-project stops.
- Check the Pulley and Bearing: Inspect related components like the clutch pulley and bearing to avoid repeat repairs.
- Recharge After Replacement: Your AC system may need a refrigerant recharge after the clutch replacement is complete.
📑 Table of Contents
- What Is an AC Compressor Clutch and Why Does It Matter?
- Signs Your AC Compressor Clutch Needs Replacement
- Tools and Materials You Will Need
- Step-by-Step AC Compressor Clutch Replacement
- How Much Does AC Compressor Clutch Replacement Cost?
- Common Mistakes to Avoid During Clutch Replacement
- Expert Insights: Getting the Most Out of Your New Clutch
- Key Takeaways
- Conclusion
What Is an AC Compressor Clutch and Why Does It Matter?
The AC compressor clutch is a small but vital part of your vehicle’s air conditioning system. It connects the engine to the compressor, allowing the compressor to engage and disengage as needed. When you turn on your AC, the clutch engages and spins the compressor pulley. When you turn it off, the clutch disengages and stops the compressor from running.
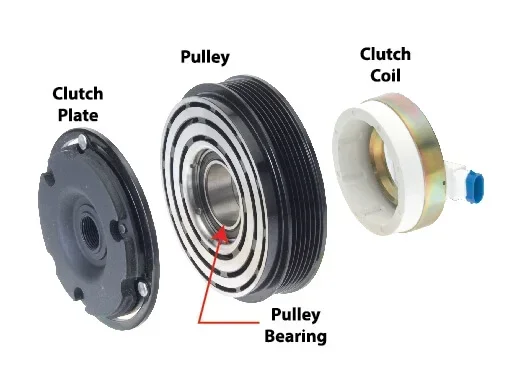
Think of it like a switch that controls power flow. Without a working clutch, your compressor cannot pump refrigerant through the system. This means no cold air, no defrost, and no dehumidification. The compressor clutch assembly includes several parts: the clutch plate, the coil, the bearing, and the pulley. Each of these parts plays a specific role in making your AC work.
How the Clutch Works
When you switch on your AC, an electromagnetic signal energizes the clutch coil. This creates a magnetic field that pulls the clutch plate against the compressor pulley. The friction between these two parts makes the compressor shaft spin. When you turn off the AC, the coil loses power and the clutch plate releases. The compressor stops spinning but the engine keeps running.
This on-and-off cycling is controlled by a compressor clutch cycling switch or the vehicle’s computer. The system monitors refrigerant pressure and temperature to decide when the compressor should run. If any part of this cycle breaks down, your AC will not cool properly.
Signs Your AC Compressor Clutch Needs Replacement
Catching the warning signs early can save you from a bigger and more expensive repair. Here are the most common symptoms of a failing AC compressor clutch:
1. AC Blows Warm Air
This is the most obvious sign. If your AC is blowing air that is not cold, the clutch may not be engaging the compressor. Without the compressor running, refrigerant does not circulate. Your system cannot cool the cabin.
2. Clutch Does Not Engage
Sometimes you can see the problem directly. Start the engine and turn the AC on. Look at the front of the compressor. The pulley should spin and the clutch hub should engage with it. If the pulley spins but the hub does not, the clutch is not engaging.
3. Intermittent AC Cooling
If your AC works sometimes and not others, the clutch may be failing. A worn clutch plate or a weak coil can cause inconsistent engagement. This cycling problem often gets worse over time.
4. Strange Noises From the Compressor
Grinding, squealing, or rattling sounds coming from the compressor area are red flags. These noises often mean the clutch bearing is worn or the clutch plate is damaged. Ignoring these sounds can lead to complete compressor failure.
5. Burning Smell or Visible Damage
A burning smell from the engine bay could mean the clutch is overheating. You might also notice visible damage like a cracked clutch plate or a discolored coil. Stop driving and get this checked immediately.
Tools and Materials You Will Need
Before you start the AC compressor clutch replacement, gather everything you need. Having the right tools ready makes the job much smoother and safer.
Essential Tools
- Socket set (metric and standard sizes)
- Serpentine belt tool or belt tensioner wrench
- Wrench set (combination wrenches)
- Torque wrench
- Clutch puller (sometimes called a clutch hub puller)
- Multimeter for testing electrical connections
- Safety glasses and gloves
- Jack and jack stands or ramps
Replacement Parts
- AC compressor clutch kit (includes clutch plate, coil, and bearing)
- O-rings for the compressor shaft seal
- AC refrigerant (R-134a or R-1234yf depending on your vehicle)
- AC system leak dye (optional but helpful)
- Compressor oil (PAG oil or mineral oil, depending on your system)
Quick Tips Before You Start
Always check your vehicle’s service manual for specific torque values and part numbers. Make sure you have the correct clutch kit for your vehicle make and model. Using the wrong parts can cause the new clutch to fail prematurely. Also, never open the AC system without first recovering the refrigerant. Releasing refrigerant into the atmosphere is illegal in many places and harmful to the environment.
Step-by-Step AC Compressor Clutch Replacement
Now for the part you have been waiting for. Here is the detailed process for replacing your AC compressor clutch. Follow each step carefully and do not rush.
Step 1: Prepare the Vehicle
Park your car on a flat surface and turn off the engine. Let it cool down if it has been running. Disconnect the negative battery terminal first. This prevents any electrical shorts while you work. If you need to lift the vehicle, use jack stands for safety. Never work under a car supported only by a jack.
Step 2: Recover the Refrigerant
This is the most important safety step. You must recover the refrigerant from the AC system before disconnecting any lines. Use a certified AC recovery machine. Attach the hoses to the service ports on the AC system. The machine will suction the refrigerant into a recovery tank. Never vent refrigerant into the air.
Step 3: Remove the Serpentine Belt
Locate the serpentine belt tensioner. Use your serpentine belt tool to rotate the tensioner and release the belt tension. Slide the belt off the compressor pulley and set it aside. Take a photo of the belt routing before you remove it so you can reinstall it correctly.
Step 4: Disconnect the Electrical Connector
Find the electrical connector on the back of the clutch coil. Press the locking tab and carefully pull the connector free. Use your multimeter to check for voltage at the connector when the AC is turned on. This helps confirm whether the problem is electrical or mechanical.
Step 5: Remove the Old Clutch
Unbolt the clutch housing from the compressor. Keep track of every bolt and washer. Once the housing is removed, you will see the old clutch plate, coil, and bearing. Use a clutch puller to carefully remove the old clutch hub from the compressor shaft. Apply steady, even pressure. Do not use excessive force or you could damage the compressor shaft.
Step 6: Inspect the Compressor
With the old clutch removed, inspect the compressor shaft and front seal area. Look for signs of refrigerant leaks, corrosion, or damage. If the compressor shaft seal is leaking, you will need to replace the entire compressor or the seal kit. Also check the compressor pulley bearing for play or roughness.
Step 7: Install the New Clutch
Press the new clutch bearing onto the compressor shaft first. Then install the new clutch plate and coil assembly. Make sure the clutch plate is aligned correctly with the compressor hub. The alignment tab should fit into the groove on the shaft. Reinstall the clutch housing and bolt it to the specified torque.
Step 8: Reinstall the Serpentine Belt
Route the serpentine belt back onto the compressor pulley and all other pulleys. Use the belt tensioner to create tension and lock the tensioner in place. Double-check that the belt is seated properly on all pulleys.
Step 9: Reconnect the Battery and Test
Reconnect the negative battery terminal. Start the engine and turn the AC on full blast. Listen for the clutch to engage. You should hear a slight click and see the clutch hub lock to the pulley. Check for any unusual noises or vibrations. Let the AC run for at least ten minutes and verify that cold air is coming from the vents.
Step 10: Recharge the AC System if Needed
After opening the AC system, you may have lost some refrigerant. Use an AC gauge set to check the system pressure. If the pressure is low, recharge the system with the correct type and amount of refrigerant. Add the recommended amount of compressor oil if needed.
How Much Does AC Compressor Clutch Replacement Cost?
One of the biggest reasons people choose to replace the AC compressor clutch themselves is cost. Professional shops can charge a lot for this repair. Let us break down the costs so you know what to expect.
Parts Cost
A quality AC compressor clutch kit typically costs between $80 and $250 depending on your vehicle. Premium kits from brands like Four Seasons or Gates tend to last longer. Budget kits can be found for less but may not include all the components you need.
Labor Cost
If you take your car to a shop, labor costs for compressor clutch replacement usually range from $200 to $500. The job typically takes one to three hours depending on the vehicle. Some vehicles have harder-to-access compressors that require more labor time.
Total Cost Comparison
| Approach | Parts Cost | Labor Cost | Total Cost |
|---|---|---|---|
| DIY Replacement | $80 – $250 | $0 (your time) | $80 – $250 |
| Independent Shop | $80 – $250 | $200 – $500 | $280 – $750 |
| Dealership | $100 – $300 | $300 – $600 | $400 – $900 |
As you can see, doing the AC compressor clutch repair yourself can save you several hundred dollars. The trade-off is your time and effort. But for most people with basic mechanical skills, this is a very manageable first DIY project.
Common Mistakes to Avoid During Clutch Replacement
Even with good instructions, mistakes happen. Here are the most common errors people make during AC compressor clutch replacement and how to avoid them:
Skipping Refrigerant Recovery
Never skip this step. Releasing refrigerant is illegal and environmentally harmful. It also means your AC system will be empty and may not work properly after the repair. Always use a proper recovery machine.
Forgetting to Replace O-Rings
When you disconnect AC lines, always replace the O-rings. Old O-rings are the number one cause of refrigerant leaks after clutch replacement. Use new O-rings coated with clean compressor oil before reconnecting any lines.
Over-Tightening Bolts
Use a torque wrench to tighten the clutch housing bolts to the correct specification. Over-tightening can strip threads or crack the compressor housing. Under-tightening can cause the clutch to vibrate and fail prematurely.
Ignoring the Clutch Bearing
Most clutch kits include a new bearing. Always replace it. A worn bearing causes noise and can eventually seize, locking the compressor pulley and damaging the serpentine belt.
Not Checking the Compressor Shaft Seal
Before installing the new clutch, inspect the front shaft seal. If it is leaking refrigerant, a new clutch alone will not fix the problem. You will need a compressor shaft seal kit or a full compressor replacement.
Using the Wrong Clutch Kit
Not all clutch kits are the same. Using a kit designed for a different vehicle model will result in improper fitment. Always verify the part number matches your exact vehicle year, make, model, and engine size.
Expert Insights: Getting the Most Out of Your New Clutch
After completing your AC compressor clutch replacement, a few extra steps can help ensure long-lasting performance. These tips come from experienced technicians who do this repair every day.
First, run your AC system for at least fifteen minutes after the repair. This circulates fresh oil and refrigerant through the system and helps the compressor seat properly. Listen carefully during this time for any unusual sounds.
Second, check the clutch gap before final installation. The air gap between the clutch plate and the pulley is critical. Too much gap means the clutch will not engage fully. Too little gap means the clutch will slip and overheat. Refer to your vehicle service manual for the correct gap specification.
Third, consider replacing the serpentine belt at the same time. An old belt can slip and cause clutch flutter. A fresh belt ensures smooth operation and reduces stress on the new clutch components.
Finally, have someone else turn the AC on and off while you watch the clutch from the front of the engine. This lets you confirm full engagement and disengagement before you put everything back together. It is a simple check that can catch problems early.
Key Takeaways
- Know the Symptoms: Recognizing early signs of a failing AC compressor clutch can prevent costly damage to your entire air conditioning system.
- Save Money with DIY: Replacing the clutch yourself can cut repair costs significantly compared to shop labor rates.
- Safety First: Always disconnect the battery and recover refrigerant before starting any work on your AC system.
- Right Tools Matter: Having the correct tools and replacement parts ready saves time and prevents frustrating mid-project stops.
- Check the Pulley and Bearing: Inspect related components like the clutch pulley and bearing to avoid repeat repairs.
- Recharge After Replacement: Your AC system may need a refrigerant recharge after the clutch replacement is complete.
Conclusion
AC compressor clutch replacement does not have to be scary or complicated. With the right information, tools, and a little patience, you can complete this repair and keep your vehicle’s air conditioning running strong. The process follows a logical sequence that becomes easier each time you do it.
Remember to take your time, follow safety procedures, and never skip steps. The biggest reward is the money you save and the confidence you gain from completing a real car repair yourself. Your AC system will reward you with cool, comfortable air for many miles to come.
Now that you have this guide, you have everything you need to get started. Gather your tools, order your clutch kit, and set aside a weekend. You will be glad you did. Happy repairs!
Frequently Asked Questions
How do I know if my AC compressor clutch is bad?
Common signs include warm air from the vents, a clutch that does not engage, intermittent cooling, grinding noises from the compressor, or a visible clutch that is not spinning when the AC is on. If you notice any of these symptoms, have your AC compressor clutch inspected as soon as possible.
Can I drive with a bad AC compressor clutch?
Yes, you can still drive, but your AC will not work properly. In some cases, a seized clutch can damage the serpentine belt and cause other engine problems. It is best to address the issue promptly to avoid further damage to your vehicle.
How long does AC compressor clutch replacement take?
For most beginners, the job takes about two to four hours. Experienced mechanics can often complete it in one to two hours. The time depends on your vehicle model, how accessible the compressor is, and whether you need to recover and recharge the refrigerant system.
Is it cheaper to replace just the clutch or the whole compressor?
Replacing just the clutch is significantly cheaper. A clutch kit costs $80 to $250, while a full compressor replacement can cost $500 to $1,500 or more. If the compressor itself is not damaged, replacing only the clutch is the smart and budget-friendly choice.
Do I need to recharge my AC system after replacing the clutch?
Yes, in most cases. When you open the AC system to replace the clutch, some refrigerant escapes. You will need to recharge the system with the correct type and amount of refrigerant. Always use a proper AC gauge set to verify correct pressures after recharging.
What causes an AC compressor clutch to fail?
Common causes include worn clutch plates, a failing clutch coil, low refrigerant levels causing the compressor to overwork, contaminated refrigerant, or normal wear and tear over time. Regular AC system maintenance and timely refrigerant recharges can help extend clutch life.