How to Uninstall Avid Pro Tools the Right Way Today
Uninstalling Avid Pro Tools is simple when you follow the right steps. This guide shows you exactly how to remove Pro Tools from Windows and Mac computers, clean up leftover files, and avoid common pitfalls. You will learn the safest method to uninstall Avid Pro Tools without damaging your system.
So you have decided to uninstall Avid Pro Tools from your computer. Maybe you are switching to a different digital audio workstation. Perhaps you are freeing up disk space. Or maybe you are just tired of dealing with updates and crashes. Whatever the reason, you came to the right place.
Removing Pro Tools is not as simple as dragging an app to the trash. The software leaves behind configuration files, caches, and registry entries. If you do not clean those up properly, you can run into problems later. This guide walks you through every step of the process. You will learn how to uninstall Pro Tools on both Windows and Mac, remove leftover files, and deactivate your license correctly.
By the end of this article, you will feel confident about completely removing Avid Pro Tools from your system. Let us get started.
Key Takeaways
- Always back up your sessions: Save your projects before removing any software to avoid losing valuable work.
- Use the official uninstaller first: Both Windows and Mac have built-in tools that handle the core removal safely.
- Delete leftover files manually: Pro Tools leaves behind preferences, caches, and plugin files that need manual cleanup.
- Deactivate your license: This frees up your Avid account and allows reinstallation later if needed.
- Check for Avid Control and other Avid apps: Related Avid products often need separate removal.
- Restart your computer after uninstalling: This ensures all processes are fully closed and changes take effect.
📑 Table of Contents
Why You Might Need to Uninstall Avid Pro Tools
There are many reasons people decide to remove Pro Tools from their computer. Understanding your reason can help you choose the best approach. Here are some common scenarios:
- Switching to a different DAW: Many producers move between software like Logic Pro, Ableton Live, or FL Studio. Each DAW has its own workflow and plugin ecosystem.
- Freeing up disk space: Pro Tools can take up a lot of storage. The application itself, along with audio files and plugins, can eat up hundreds of gigabytes.
- Troubleshooting issues: Sometimes a clean uninstall and reinstall fixes strange bugs, crashes, or audio glitches.
- Upgrading your system: You might be moving to a new computer or a new operating system that requires a fresh start.
- Ending a subscription: If you no longer need the Avid ecosystem, removing the software is part of the process.
No matter your reason, the key is to do it the right way. A sloppy uninstall can leave behind files that cause conflicts later. It can also keep your Avid account tied to a machine you no longer use.
How to Uninstall Avid Pro Tools on Windows
Uninstalling Pro Tools on a Windows PC follows a standard process. However, there are a few extra steps you need to take for a complete removal. Here is the full walkthrough.
Step 1: Deactivate Your Pro Tools License
Before you remove anything, deactivate your license. This is very important. It releases the software from your computer and frees up your Avid account.
- Open Pro Tools on your computer.
- Go to the Help menu at the top.
- Select Deactivate or Release License.
- Follow the on-screen prompts to complete the deactivation.
If you cannot open Pro Tools, you can also deactivate through the Avid Control Panel. Open the Start menu, search for Avid Control Panel, and look for the license management section.
Step 2: Close All Avid Processes
Make sure no Avid programs are running in the background. Check your system tray for any Avid icons. Close Avid Control, Avid Media Composer, or any other Avid applications you have installed.
Step 3: Use the Windows Control Panel
Now it is time to start the uninstall process.
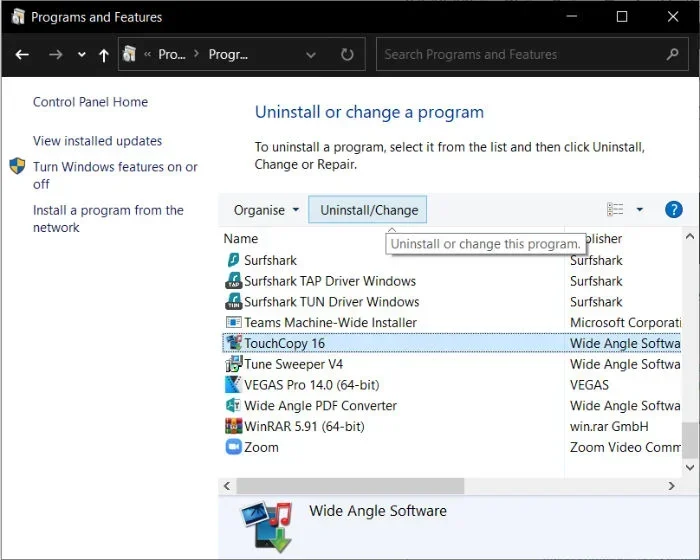
- Open the Control Panel on your PC.
- Click on Programs and Features (or Add or Remove Programs in newer Windows versions).
- Find Avid Pro Tools in the list of installed programs.
- Click on it and select Uninstall.
- Follow the prompts and let the uninstaller do its work.
The built-in uninstaller will remove the main program files. However, it will not delete everything. You still need to clean up leftover files manually.
Step 4: Remove Leftover Files and Folders
This is where most people skip steps and regret it later. Pro Tools leaves behind several folders and files that you should delete.
Open File Explorer and navigate to these locations. Delete the folders if they exist:
- C:\Program Files\Avid or C:\Program Files (x86)\Avid
- C:\Users\YourName\AppData\Roaming\Avid
- C:\Users\YourName\AppData\Local\Avid
- C:\Users\YourName\Documents\Avid
Also check the ProgramData folder. Press Windows Key + R, type %ProgramData%, and press Enter. Look for any Avid-related folders and delete them.
Step 5: Clean the Windows Registry
The registry stores settings for all your programs. Over time, Pro Tools entries can pile up and cause issues. Be careful here because editing the registry can affect your system.
- Press Windows Key + R to open the Run dialog.
- Type regedit and press Enter.
- Navigate to HKEY_CURRENT_USER\Software\Avid and delete the Avid folder.
- Also check HKEY_LOCAL_MACHINE\SOFTWARE\Avid.
- Delete any Avid-related keys you find.
Warning: Always back up your registry before making changes. You can export it by clicking File and then Export in the Registry Editor.
How to Uninstall Avid Pro Tools on Mac
Removing Pro Tools from a Mac is a bit different from Windows. Apple uses a different file structure, so you need to know where to look. Here is the complete process for macOS.
Step 1: Deactivate Your License
Just like on Windows, start by deactivating your Pro Tools license. Open Pro Tools, go to the Help menu, and select Deactivate. This step protects your Avid account and allows you to install Pro Tools on another machine later.
Step 2: Quit All Avid Applications
Open the Activity Monitor (Command + Space, then type Activity Monitor). Look for any Avid-related processes and force quit them. This includes Pro Tools, Avid Control, Media Composer, and anything else Avid related.
Step 3: Move Pro Tools to the Trash
Open Finder and go to the Applications folder. Find Pro Tools and drag it to the Trash. You can also right-click and select Move to Trash.
But do not empty the Trash yet. There are more files to remove first.
Step 4: Delete Support Files and Folders
Pro Tools stores a lot of data outside the main application folder. You need to remove these manually.
Open Finder and press Command + Shift + G. This opens the Go to Folder dialog. Enter each of these paths and delete the Avid folders you find:
- ~/Library/Application Support/Avid
- ~/Library/Preferences/com.avid.protools.plist
- ~/Library/Caches/com.avid.protools
- ~/Library/Saved Application State/com.avid.protools.savedState
- ~/Documents/Avid
- /Library/Audio/Plug-Ins/Components/Avid
- /Library/Audio/Presets/Avid
The tilde symbol (~) represents your home directory. These hidden folders contain settings, caches, and preferences that the uninstaller does not touch.
Step 5: Remove Avid Plugins and Components
If you used Pro Tools plugins like Avid Audio Engine or other Avid plugins, you should remove those too. Check these locations:
- /Library/Audio/Plug-Ins/VST/
- /Library/Audio/Plug-Ins/Components/
- /Library/Audio/Plug-Ins/AU/
Delete any Avid-related plugin files you find in these folders.
Step 6: Empty the Trash
Once you have deleted all the files, right-click the Trash icon and select Empty Trash. This permanently removes Pro Tools from your Mac.
Removing Related Avid Products
Pro Tools often comes bundled with other Avid software. If you are doing a full cleanup, you should remove these as well.
Avid Control
Avid Control manages your licenses and plugins. To remove it on Windows, go to Programs and Features and uninstall it. On Mac, drag it from the Applications folder to the Trash and delete its support files from the Library folder.
Avid Media Composer
If you also use Media Composer, follow the same uninstall steps. Deactivate the license first, then remove the program and its support files.
Avid Download Manager
The Avid Download Manager handles software updates and downloads. You can remove it through the Control Panel on Windows or by moving it to Trash on Mac.
Avid Plugins and Virtual Instruments
Many users have Avid plugins like Xpand!2, Vacuum, or other virtual instruments. These need to be removed separately. Check your plugin folders and delete any Avid-related files.
Common Mistakes to Avoid When Uninstalling Pro Tools
Even experienced users make mistakes when removing software. Here are the most common errors and how to avoid them.
Skipping the Deactivation Step
This is the number one mistake. If you do not deactivate your license, your Avid account remains tied to that machine. You will not be able to install Pro Tools on another computer until you free up the license.
Forgetting to Delete Leftover Files
The uninstaller does not remove everything. Preferences, caches, and plugin files stay behind. These can cause conflicts if you reinstall Pro Tools later or install a different Avid product.
Not Backing Up Your Sessions
Before you uninstall anything, make sure your session files are safe. Copy them to an external drive or cloud storage. Once Pro Tools is gone, you may have trouble opening old session files.
Using Third-Party Uninstaller Tools Without Caution
There are many uninstaller tools available that promise to remove software completely. Some of them are safe, but others can delete important system files. Stick to the official uninstaller and manual cleanup for best results.
Ignoring the Registry on Windows
Skipping registry cleanup leaves behind entries that can slow down your system over time. Take the extra few minutes to clean the Avid registry keys.
What to Do After Uninstalling Avid Pro Tools
Once you have removed Pro Tools completely, there are a few things you should do to make sure everything is clean.
Restart Your Computer
A restart clears out any remaining processes and ensures that all changes are applied. This is a simple step that many people overlook.
Check for Avid Account Activity
Log in to your Avid account at avid.com. Go to your license management section and verify that Pro Tools is no longer active on your computer. This confirms that the deactivation worked.
Free Up Additional Disk Space
Use a disk cleanup tool to remove any temporary files. On Windows, you can use the built-in Disk Cleanup utility. On Mac, use the Storage Management tool in System Preferences.
Consider a Fresh Install Later
If you plan to reinstall Pro Tools in the future, a clean uninstall gives you a fresh start. When you reinstall, the software will run more smoothly without old configuration files causing issues.
Frequently Asked Questions
Can I reinstall Avid Pro Tools after uninstalling it?
Yes, you can. As long as you deactivated your license properly, you can reinstall Pro Tools on the same computer or a different one. Just download it from the Avid website and log in with your account. The reinstallation process is straightforward and usually takes less than an hour.
How long does it take to fully uninstall Pro Tools?
The actual uninstall process takes about 10 to 15 minutes. However, the manual cleanup of leftover files can add another 15 to 20 minutes. If you also remove related Avid products, plan for about 30 to 45 minutes total. It is worth the time to do it completely.
Will uninstalling Pro Tools delete my audio files?
No, uninstalling Pro Tools does not delete your audio files. Your session files, audio recordings, and project files are stored separately from the application. However, it is always a good idea to back up your work before removing any software, just to be safe.
Do I need to uninstall Avid plugins separately?
Yes, you should. Pro Tools plugins are stored in different folders than the main application. If you leave them behind, they can take up space and potentially cause conflicts with other audio software. Remove them from your system plugin folders and user library folders.
Can I use a third-party uninstaller to remove Pro Tools?
You can, but it is not necessary. The official Avid uninstaller combined with manual cleanup is the safest method. Third-party tools can sometimes remove files they should not. Stick to the steps in this guide for a reliable and complete removal.
How do I free up my Avid license after uninstalling?
Make sure you deactivated the license before uninstalling. If you already removed Pro Tools without deactivating, log in to your Avid account online and check the license management section. You should be able to release the license from the old machine there.
Final Thoughts
Uninstalling Avid Pro Tools does not have to be complicated. By following the steps in this guide, you can remove the software completely and cleanly from your computer. Whether you are on Windows or Mac, the process is manageable as long as you take it step by step.
Remember to deactivate your license first. This is the most important step and one that many people skip. Then use the official uninstaller, remove leftover files manually, and clean up any related Avid products. Take your time and do not rush through the process.
A proper uninstall protects your Avid account, frees up valuable disk space, and sets you up for a smooth reinstallation if you ever need one. Now you have all the knowledge you need to uninstall Avid Pro Tools the right way. Go ahead and get it done with confidence.